Wednesday, June 27, 2012

Technology Tutorial: Adding Pages to Your Google Site

This is Week 2 in my summer series about building an awesome class website using Google Sites. You can check out Week 1 of the series HERE.


Part 3: Types of Pages

When you add a page to your Google site, you're given four different options. 

Option #1: Your basic webpage
This is just your traditional page that could include text and links to other subpages. Here's an example of a page of my website that uses this option:


Clicking on any of the red text hyperlinks will just take you to another subpage within my website. When you get further into my website, the links might take you to external sites such as games or readings that support the concept I'm teaching. Regardless, this option is the one that I use 95% of the time when I'm adding new pages to my Google Site.

Option #2: Announcements
This is a lot like a blog-feature for your website, but without a lot of bells and whistles. It's a page that you can update frequently, and the most recent update will appear at the top of the page. For my class website, I use this type of page to post homework and announcements.


Option #3: File Cabinet
This option is a way for you to upload files and make them available to others to download. I have a page of my website simply called "Filing Cabinet" and it's where I'll upload any of the frequently used pages that students are likely to need or misplace (e.g., reading logs, spelling contracts, extra grid paper for a math assignment, etc.). You can organize the contents into folders, add descriptions, and automatically leave info about what version it is (if you replace a file, for example) or when you uploaded it so parents can see recent additions. I love this page because it really eliminates a lot of homework excuses.


Option #4: List
I'll be honest -- this is a feature that I've never used. The description says that it lets you make and organize pieces of information (lists!), but I've never had a situation where I really needed to do that on my website. Perhaps it would be good to use if you were organizing a field trip or something like that.

Part 4: Organizing Your Site

When you first set up your website, you'll just have a Home Page -- at least, that's the case if you use a blank template. From there, each additional subpage that you add will either be nested at the top level, or you can choose to nest it under something else. Here's an example.


When you look at the Navigation side bar on my website, you can see several subpages listed. 
These are all of the pages that I've created at the "Top Level" because I thought they should be easy to find and I wanted it to be fairly easy to navigate. I put all of my most important or big topic pages as "Top Level." The only exception is "Biography Project Choices" -- which is only listed there because I wanted my students to find it immediately for an in-class activity. 


If you click on "Curriculum - Grade 4," however, you can see the subpages that I've nested beneath it listed at the bottom of the "Curriculum" page.


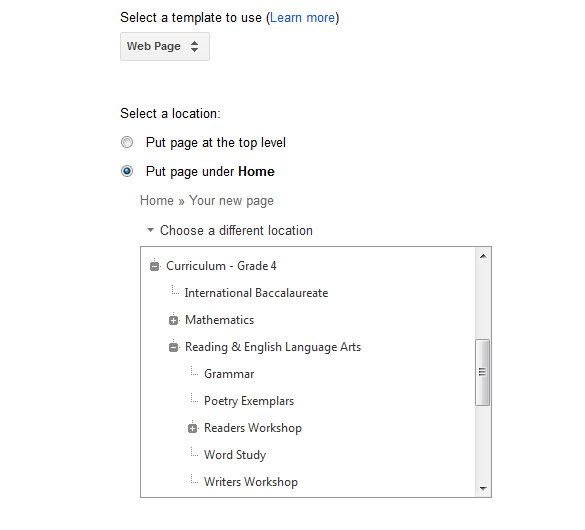
To do that, I just click "Put page under Home" and then select the option "Choose a different location" when I'm adding a new page. This will show you all of the top level and subpages you've already created.


One of the things that I really like about the site is that no decision has to be permanent. If you want to reorganize your site -- something I'll do with mine this summer -- you can always move pages around. Just go to the page, click "More" along the editing options at the top, and then choose "Move Page" and it will take you to a menu just like the one above. It's very easy to organize and re-organize in that way, and it will update all of your links automatically.

Homework :)

If you're working on starting your own Google Site this summer, play around with the different types of pages. Try to create a curriculum page, an announcement page, and a filing cabinet. You are welcome to check out my website if you need ideas, but just remember that it's a work-in-progress. In fact, I think classroom websites are always a work-in-progress. I'm constantly adding links to new resources I find or reorganizing it to better suit my class and my instructional needs. Don't feel like it needs to be "100% done" before you share it because honestly, you'll probably never reach that point. Some information is better than none.

What features do you want to include or already use in your classroom website? Please share some of your ideas in the comment section as I would love to hear them!

Quick update

The tech tutorial is a little delayed. I managed to dunk my hand in a pan of boiling water last night, and it was too painful to type. :(  It's feeling better today, but I'm at an International Baccalaureate conference all day, so I won't have time to work on it until tonight. But it's coming, I promise...

On an unrelated note, are my graphics visible to you? I'm not able to see them, and I don't know if it's just issues with the public internet filters where I'm at for the conference or if there's a problem with the graphics. I can see them on my cell phone when I'm not using wi-fi, but I'm curious if other people  are having problems. If someone could leave me a quick comment, I'd really appreciate it.

More to come!

Monday, June 25, 2012

Management Monday: The Origins of Eberopolis

When I did my student teaching several years ago, I worked for a full year in a second grade classroom that used a classroom economy. My mentor teacher's last name was Valentine, and when we merged our two names together, we created "Ebertine Village." This is how we referred to our class throughout the rest of the year.

When I broke off into my own classroom, I didn't have another person to teach with. It was just me all by my lonesome, so I needed to create a new name for my learning community. Eber is a short last name, so I didn't want to add "Village" or something like that onto the end as a second word. Instead, I had much grander ambitions of world domination. Hence, Eberopolis was born.

Since that year, I've taken the Eberopolis theme and ran with it in my classroom. As I described with my class jobs post last week, I try to match my job descriptions with real world jobs. All of my students earn salaries for completing those jobs, and they pay rent and taxes in my class. They also earn bonuses or pay fines according to the choices they make. Here's a poster that describes the "Financial Rights and Responsibilities in Eberopolis."

At the end of the week, we figure out how much money they have, and they can choose to either save or spend their money in our class store.

My system has evolved a lot in the last 5 years, and I've finally taken the time to put it all together in a format that can be shared with others. It took me over a week of tinkering and writing, but my Classroom Economy Megapack is now available in my Teachers Pay Teachers store. It contains several pages of detailed text about our classroom routines, set up procedures, and tips and tricks I've learned throughout the way. There are several classroom printables, posters, rewards certificates, and student and teacher-forms in the packet as well. It was quite the labor of love, and I'm really happy with how it turned out. It's over 60 pages in all.
Given how much work went into making and testing it, I'm going to be selling it for $10. But from now through Friday at noon (EST), I'll be selling it for 20% off. That's right -- over 60 pages of class economy goodness for $8.00. There's a 10 page preview over at TpT. So if you're thinking about setting up a classroom economy this year, please consider checking it out.

Tomorrow, I'll be back with another Google Sites tutorial.
See you next time!

Saturday, June 23, 2012

Weekend Reading - June 23, 2012


From the blogosphere...

I was about a month behind on my blog reading. It seems that the reading and writing go hand-in-hand for me, but I'm getting back in the groove of things. Here are some of my favorites from this week...

From the bookshelves...

I'm giving a lot of thought to how I'm going to be teaching writing next year with the Common Core, and I'm pulling this book off my bookshelf.


I read it a long time ago, and it's time to revisit it. Hopefully it will give me some new ideas and inspiration to share next week. I'll also be attending a three-day conference about The Written Curriculum in International Baccalaureate Primary Years Programme. Who knows what creativity that will inspire?! :)

Have a great weekend!

Friday, June 22, 2012

Friday Freebie: Writer's Workshop Management

Pinterest is doing awful amazing things for my summer productivity...

Today's freebie is a bit of a DIY because I attempted to be crafty this week! Perhaps this will inspire some of you to be crafty as well.

I teach writer's workshop every day in my classroom, and one of the big things that I constantly deal with is managing my students in the writing process. When I first started teaching, I made a wheel that had the different stages of the writing process on it, and the students each had clothespins to attach. I liked the wheel, but it wasn't big enough. When we started a project, for example, I'd have all of my students in the "pre-writing" stage, and there wasn't enough space to have all of the clothespins there without spilling over into another section. It was kind of a mess.

As I entered the technology age (or rather, as my classroom entered the technology age...I was already there...), I had the students show where they were in the writing process using a template on our interactive whiteboard. It worked well in theory, but usually I'd have materials from our mini-lesson that I'd want to leave projected while the students were writing, and I couldn't project that AND the writing process template. So it was back to the drawing board...

This is what I came up with...

I'm going to punch a hole in the top of "pre-writing" and hang it up in an easily accessible spot in the classroom. Overall, I'm pretty happy with how it turned out -- especially since I'm not typically very crafty! It's not too large -- about 18" x 18" and it's in the blue/green color scheme I've decided to use in my classroom this year.

Here's what you need to make your own:

To build the wheel:

To fit the pieces together:
  • Duck Tape
  • 8 Bamboo Skewers (optional -- you may find a better assembly method. I just used what was easily accessible at home...)
To keep track of students throughout the process:
  • 30 Mini Clothespins

Here are the steps I took to build my writing process wheel.
1. Trace your cake circle onto the white side of a piece of scrapbook paper. (I used 12" scrapbook paper, and I had a lot of waste since I could only use one circle per page).
2. Cut out your circle leaving about a 1" margin along the outside of the circle. This doesn't need to be exact, but you're going to want to cut a circle that's about 8" in diameter. (See picture below). Then, cut strips along the outside of the circle into the line that you traced around the cake circle to create a fringe effect. This will make it easier to wrap the scrapbook paper around the cake circle.
3. Apply a thin coat of Mod Podge to the brown/unfinished side of the cake circle and affix it to the white side of the scrapbook paper.
4. Apply a thin coat of Mod Podge along the outer inch of cake circle, and begin folding over the flaps of scrapbook paper all the way around the circle, adding more Mod Podge as necessary to keep the flaps down.
5. Allow the Mod Podge to dry completely.
6. Cut out the pieces of the Writing Process Descriptors Template to affix to the front side of the cake circles.
7. If the cake circles are completely dry, flip them over so the front side is facing you. Apply a thin coat of Mod Podge to the front side, and carefully place the Writing Process cutouts so that there is one on each cake circle. Carefully smooth out the edges and apply a small amount of additional Mod Podge to the top of the cake circle using your foam brush. (Be careful not to press down too much or use too much Mod Podge. I had some issues with it causing the color from my templates to bleed a little bit when I wasn't careful.)
8. Once you've affixed the templates to the 7 cake circles, it's time to arrange the steps of the writing process and begin fastening them all together. I used bamboo skewers and duck tape, but you may find a better process that works for you. I'm not exactly a master of crafty construction. :-) Here's how mine looked, and please remember that it's the BACK of my finished work, so no one besides you will ever really be looking at it!
9. Finally, I numbered the mini clothespins from 1 to 30, and clipped them to the pre-writing stage. Once I'm able to move it back into my classroom, I'll also punch a hole in the top and hang it from a ring beneath one of my bulletin boards.
So there you have it! One of my most recent attempts at craftiness! To get your copy of the FREE Writing Process descriptors, visit my TpT store. And while you're there, you might want to check out my Colorful Class Schedule Cards that I'll be using this year. (I report back in a little over a month, y'all. Can you believe that?!? I'll have kiddos in my room on August 1! Lots to prepare and share between now and then!)

What projects are you working on or hoping to work on for your classroom? I'd love to hear about it in the comments!

Have a great Friday!

Tuesday, June 19, 2012

Technology Tutorial Tuesday: Getting Started with a Google Site

For the next several weeks, I'll be devoting my Tuesday tutorials to talk about building an effective classroom website using Google Sites. After all, there's no better time than the summer to work on building your class website!


Part 1: Why websites matter

I'm not sure what it's like in your district, but there's a pretty large range of quality for classroom websites at all the places that I've ever taught. There are some teachers who update their websites regularly, and then there are others who work on their website for the couple hours devoted to staff website development on a professional learning day, and then never go back. This is unfortunate because having a great classroom website can be a huge plus for communication and classroom management. For me, my classroom website serves 3 important purposes:

1. It makes all of my technology lessons run effectively in the classroom. Given how much we use technology in my classroom, it helps if my students can go to one central website and get links to everything they need for the day's lesson. Sure, I still teach them how to do good web searches, but if I know a particular site that they need to use that day, I'd rather have them click a link than search for the site or try typing in the http address on their own. 
2. It facilitates communication with parents. I can give parents all of the information they need about homework, upcoming assignments and events, special requests, and curriculum in one easily accessible spot. As a side note, having a high quality classroom website can help make a good first impression when the parents invariably Google you before your back-to-school meet and greet. ;-)
3. It signals to the larger community that you're organized and competent. When I was job-hunting from out of state a few years ago, one of the biggest things I used to form my impressions about schools was their school and class websites. I narrowed my list of possible schools to apply to from that information alone, and I know from talking to other teachers recently hired in my school, they did the same. From a recruitment perspective, high quality websites can make a lasting and positive impression -- especially on new teachers.

Part 2: Getting Started

A couple of years ago, after a long story catastrophe that ended in me losing my class website, I decided to start over and move to Google Sites. Now, I will never use anything else. (And when my district eventually insists that I have a FirstClass website, I might humor them by making a Home page on FirstClass that links to my Google site...). Google Sites are very user-friendly, easy to edit, and they have a lot of features that I haven't seen matched by any other site -- particularly for those of us who are not great with coding HTML.

Here's a short (1 minute) introductory video from Google that overviews Google Sites.


To start building your own class website, you'll need a Google account. Then go to http://sites.google.com. Once you are logged in there, you'll see a screen that looks like this:


The first thing you'll want to do is select a template. There are two good options:


Option #1: Classroom site, which will pull up a page that looks like this:


It already has many of the common features you'd want on your website. You would just click the pencil icon toward the top of the page to edit the text and replace it with your own information. It's very user-friendly.

Option #2: Blank Template, which is a little more complicated than the pre-made template, but it's still pretty easy to navigate. This is the option I chose for my website because I wanted my site to be more personalized and less cookie-cutter. Either option is a good one to work with. Here's what the blank template has become on my classroom website (you can click on the image to go to my actual classroom website):

Once you've chosen a template, you can name your site and select themes to play around with the look of your site. Don't worry if you haven't decided on a look just yet --  you'll be able to go back and change themes later if you'd like.

Once you click "Create," you're done. You'll have your own website! Take some time to play around with the features and explore how the site works. Also think about what kind of information you'll want to include on your class website. Next week, we'll talk about adding pages and subpages and organizing your website. In the meantime, you're welcome to explore my class website, and I'd love to check out yours! Please leave a link to your class website -- no matter what stage it's in -- in the comments section so we can share ideas and resources.   

Professional Development & Organizations

I love getting magazines in the mail. Although Pinterest may be curbing magazine cravings a bit, I still love thumbing through the pages of a magazine and reading whatever article catches my attention. This is particularly true for professional journals where I invariably find myself annotating the pages in a way that would make Stephanie Harvey and Anne Goudvis proud. One of my favorite journals to do that with is Teaching Children Mathematics published by the National Council of Teachers of Mathematics.


A few years ago, I chose math as an area where I really wanted to improve my instruction, and this journal had a lot of practical suggestions and articles targeting elementary math teaching. It comes out monthly during the school year and takes a break during the summer. Even though I feel pretty confident about teaching 4th grade math these days, I still keep my NCTM membership active every year so I can continue to receive this publication.

Another huge benefit of my NCTM membership that I've experienced is that I've been able to volunteer as a materials and articles reviewer. With articles, I get emailed a few times a year with a request to read and give feedback on an article that someone has submitted for publication. It's a really interesting process to see pieces that are ultimately rejected or to work with an author through the revision process on an article that eventually gets published. I feel like being an articles reviewer has helped me improve as a writer, and it has definitely increased my understanding of what it takes to get an article published should I decide to submit something someday (and I will...). Being a materials reviewer is even cooler, though. For that, NCTM sends me books, games, or other classroom materials to read or try out. As long as I write a 250-word review of whatever item they send me, I get to keep it. I don't review materials more than once or twice a year, but all the stuff that I've received in that process has been great stuff that I can actually use in my classroom. For example, I've had fraction games and an entire series of books about the math process standards sent to me -- a set that would have cost me over $100 to purchase -- AND I've been published in their "Reviews and Views" section of the journal a few times. Talk about win-win!

I don't normally use my blog to plug other resources and such, but since I know my readers are people who a) teach, b) read teaching-related materials, and c) would probably be willing to trade 250 well-written words for free classroom stuff, I wanted to encourage you to consider joining NCTM during their current membership drive. I would say that it has probably been the most helpful major professional organization that I've joined (and I belong to many...), and their membership costs are pretty reasonable, IMHO.

If you do decide to join, would you please list me as your referring member? On the application, just mention that you were referred by Alison Eber, member #4165422. Your referral will enter me into a drawing and it may qualify me for additional discounts off NCTM resources, but I swear this isn't my great money-making scheme of the summer. :) You can read the specifics about the refer-a-friend perks here.

What are some of your favorite professional organizations and why? Feel free to share in the comments section!  

Monday, June 18, 2012

Management Monday: Classroom Jobs

Ok, yes...I do realize that I was MIA for about a month and a half. I got swept up in the whirlwind of testing, end-of-year festivities, packing up my classroom for the summer, overhauling my family's diet to accommodate my baby's newly discovered food allergies, and then overcoming bronchitis, a sinus infection, and a family-wide bout of stomach flu.

So, no. I didn't have as much time to blog as I would have liked, but I'm back now. And wow -- do I have lots to catch up on!

I love summer vacations. They give me just the break that I need to recharge and get excited about the new school year. They're a time when I can pull my non-teaching life together (doctor's appointments, housecleaning, miscellaneous projects put on the backburner for forever...you know the routine), but it's also a time when I can reflect about what I want to change for the upcoming school year.

One of the biggest things that I want to change is how I do my classroom jobs.

If I've learned anything in the last year of becoming a working mom, it's that I need to streamline processes and delegate more. I think my classroom jobs are an area where I could definitely stand to improve on both of those concepts.


This is what my job board has looked like in the past. I've had the following jobs:
Ambassador - line leader
Caterer - handles all things related to our lunch count
Computer tech - assists with technology; makes sure everything is plugged in/shut down at end of the day
Class Lieutenant - monitors class at bathroom breaks or if I need to step out into the hall
Clerk - collects and organizes papers
Courier - delivers messages to office
Date Keeper - helps with class calendar
Distributors - (2 students) pass out materials
Librarian - keeps class library organized
Lumberjack - sharpens all pencils before or after school
Manager - turns out lights and closes door behind us when we leave
Microbiologist - dispenses hand sanitizer at lunch
Sanitation Engineers - (2 students) wash tables in classroom and at lunch
Secretary - records assignments for absent students
Street Sweep - handles any spills/messes on the floor
Temp - takes over the job of any student who is absent
Valet - holds doors for the class
That's 17 total jobs covering about 19 students. Any student who doesn't have a job goes into the "Soon to be hired" pool. Then every Monday, we would rotate jobs.

Here's what I dislike about my current system:
1. Not enough jobs. Last year, I had 26 students, and I expect to have about that many this year. I'd like to create a system where everyone has a job all the time.
2. Too much job switching. While it only took me a couple minutes to rotate the cards on Monday mornings, I can't begin to count the number of times I'd forget to do it. Monday mornings are just too hectic for me. Then, even when I did remember to switch the jobs, I'd lose track of who had each job. So when we'd get to the cafeteria and need to wash down our tables at the end of lunch, I wouldn't know which students were responsible (and they'd forget to check, too).
3. Too little specialization. Given that students rotate through each of the jobs, there would inevitably be weeks where one of my little troublemakers would land themselves an important job like "Class Lieutenant." Or my "Lumberjack" would be a student who was chronically tardy, so she couldn't do her job during a non-instructional time.

What I plan to do differently next year:
1. Add more jobs. I have some ideas for some new jobs that I can fold into the mix. I'm planning to redesign my job board anyway, so now is a good time to add.
2. Change jobs every 6 weeks. We have 6 week terms at my school, and that seems like a good amount of time for students to spend on a job. They'll get to experience enough different jobs throughout the year so they can mix things up, but they'll also be on a job long enough that there shouldn't be any question of whose responsibility it is.
3. Create a job application. I'll have students choose their top 5 jobs and explain why they're qualified to do those jobs. That will give me some feedback about their preferences to help me assign the jobs, and it will also give them some authentic writing experience.

My jobs will integrate with my class economy, and I'm planning to share more about that in future posts. In the meantime, what are some of the class jobs that you use in your classroom? Please share in the comment section!
Related Posts Plugin for WordPress, Blogger...