Showing posts with label assessment. Show all posts

Friday, July 4, 2014

How to Outsource Your Running Records

Running records are the bane of my existence.

Ok. Maybe that statement is a little too strong. I really value the information that comes from conducting a running record, but my school requires that I conduct them every 6-12 weeks (depending on the student's reading level), and when I have to test 28 students, that takes a LONG time. Listening, recording, analyzing. Ugh. I can pretty much forget about teaching reading that week, unless I give some feedback after the students read (and then it takes 2 weeks to get through them all).

And then I went to ISTE and heard about Literably.


Literably is a service that audio records students reading Fountas and Pinnell leveled texts (A through Z) and sends you a complete running record within 24 hours. You set up your classroom, assign the level each student reads, and the student just hits "record" when he or she is ready to start. All that's needed is a microphone. Once the student has read for a minute, it automatically sends the recording off for analysis.

The analysis that comes back has all of the miscues, substitutions, and omissions labeled and analyzed for meaning, syntax, and visual errors. It also includes the rate in words per minute and the accuracy percentage. You'll also receive the audio file so you can share it with parents and listen to it yourself.

A free account includes 15 running records each month. If the audio quality is too poor for scoring, it won't count towards your 15. A premium account includes unlimited running records for one class and costs $19/month.

I will definitely be trying out this service. It will give me all of the assessment data I need while freeing me up to work with small groups and confer with students about the books they're reading. Talk about win-win.

Are there any apps or online services you use for reading assessments in your classroom? I'd love to hear about them in the comments!

Tuesday, March 25, 2014

Integrating Peer Feedback

Sometimes my students surprise me.

We're studying the Measurement and Data standards right now in math, and we were struggling a bit with 4.MD.2 - the measurement word problems standard. We've been using some of the free math units from Engage NY (a resource I highly recommend), and we were on day 3 of working through word problems, and I knew I had to mix it up a bit. Here's what we did.

First, students worked through 6 word problems from module 2. The word problems were multi-step and used many different types of metric measurement. They completed these problems independently, but they could consult other students if they got stuck. Once everyone at the table finished, they checked their work with each other to make sure they agreed on the same answer.

Next, I assigned each table a different focus problem from the 6 that they solved. They had about 10-15 minutes to work together to design a poster that explained the problem and solution. They could represent their work any way they wanted, but the work had to speak for itself -- they wouldn't be there to explain the poster to anyone else.

Once the posters were completed, I gathered the students together on the carpet, and we reviewed the Standards for Mathematical Practice using these posters I've made:


We talked about using these standards as opportunities to give feedback. We also discussed how effective feedback needs to be specific and constructive. If you like something, say what, specifically, you liked and how it helped communicate an idea. If something needed to be improved, explain what and how that could be done.

Once I felt like the students had some ideas for ways to give good feedback, I had the students do a gallery walk around the classroom to look at the other posters. In a gallery walk, students use sticky notes to comment on other people's work. They can leave positive and/or constructive feedback. I let the students comment anonymously if they wanted, and they were able to reference the SMP posters if they needed ideas (I gave them access to a digital copy on their iPads). I used a timer, and they spent 5 minutes studying and commenting on each poster before rotating.


Once they'd rotated through all of the posters, the returned to the poster their group had made, and they took a few minutes to read the feedback. I had them work together to sort the feedback into the categories "helpful" and "not helpful."

We shared a few examples of helpful comments with the whole class:
  • "I like how the team drew pictures to represent the problem, but I think the team could have explained what each picture represented from the problem."
  • "The pictures aren't in proportion to one another. The drawing of 1,500 mL is much larger than 3 L, but really the 3 L should be larger."
  • "Something I really like about your poster is that it has pictures to represent the problems. One thing that you could have done differently is represent the subtraction and addition with a tape diagram."
  • "You could have represented the answer in mixed units to make your answer clearer."
We then talked about unhelpful comments -- one word comments or feedback that focused more on style than substance.

Overall, this lesson was very helpful in getting the students to think about the Standards for Mathematical Practice and how to give effective feedback. Each group had ideas for things they wanted to change on their posters based on peer comments, and some groups even asked to work on it more during recess! It was also a good reminder for me that students can give each other powerful feedback, and I need to provide them with more opportunities to do this across the subject areas.

If you'd like to get a copy of my student-friendly Standards for Mathematical Practice posters, they're available in my TpT store by clicking the image below.


What are some ways you incorporate peer feedback in your classroom? I'd love to hear more ideas in the comments section!

Tuesday, May 7, 2013

Paperless Mission #8: Conduct and Archive Running Records (iPad)

This is the eighth installment in my Go Paperless! Challenge series. You can see the other entries in the series here. Also be sure to link up with my Paperless Challenge Linky!

Mission #8: Conduct and Archive Running Records 

At least once each six-week term, teachers at my school are supposed to conduct a running record as a guided reading level assessment. We use the Fiction Level Reading Assessments provided by the Teacher's College Reading and Writing Project, and before my move to paperless, this system was a mess for me. I'd have one binder that was all the student copies of texts, and then I'd have a huge paper pile of blank assessments that I could fill in as I worked with students. Invariably, I'd have a ton of kids reading on level S, for example, and I'd run out of my copies of that assessment, so it was back to the copier to make more. Then I'd have to deal with recording the data and filing them all, and it was a bit of a nightmare.

Paperless rocks. The nightmare is over.

In this tutorial, I'll share how I'm using Dropbox, GoodReader, and Evernote to conduct running records anytime and anywhere on my iPad. You might want to get a good iPad stylus, too, if you like that "pen in hand" feel.

Step 1. Download all of the running records to a folder on Dropbox.


You will also want to print one student copy of each assessment. I still keep all of those in page protectors in a binder so I can hand one over for the student to read off of, but I never make copies of these. It's a one-time paper expense that I'm happy to live with.


Step 2. Import the guided reading assessments into your GoodReader app.

Once you're done saving them to Dropbox, open up GoodReader and connect to DropBox. There's more information about this in the previous GoodReader tutorial, Mission #6.


Step 3. Choose the appropriate level, and open up the teacher copy in GoodReader.

The first time that you want to annotate the document, you'll be prompted to "Create an Annotated Copy" or "Save to This File." You will want to choose "Create an Annotated Copy" so you don't lose your blank copy. Otherwise, you'll have to download these files every time you want to use them, and that's only marginally better than running to the copy room -- trust me.


Step 4. Use the annotation tools to mark up student reading as you normally would. 

I won't lie -- the first couple times I did this, it felt a little awkward. You have to remember to save the document if you're switching between tools or trying to scroll/resize. But it does get better quickly, I promise! The more you use the tools, the more fluid your movements will be. It didn't take me long to get back to the level of proficiency I had with paper copies, and while my writing is a little messier on the iPad, it definitely gets the job done.


Step 5. Rename the file using the manage files option on the home screen of GoodReader. 

To get back to the home screen, tap the center of your screen -- away from any annotations -- and it should show you the main menu or "My Documents" up at the top left.


Step 6. Move the renamed running record over to the student's notebook in Evernote.

To get there, go into Manage Files again, and then select Open in. . . 


You'll be prompted to flatten annotations. Make sure you choose this or your annotations may be lost. 


Select Evernote, and it will launch your Evernote app. From there, you can move it into the appropriate notebook and type in any notes that you want to remember about the student's reading.


Extra Credit: Create a simultaneous audio file in Evernote.

This is something that I've been playing around with lately, and I think the possibilities for this are amazing. Once I have everything set up so that my student has the student copy of the text and I have the right running record file open in GoodReader, I go into Evernote, open a new note, and start an audio recording using the microphone icon. I tell the student to start, and then I use 4 fingers to swipe quickly from right to left across my iPad. This takes me back to GoodReader (or whatever my last open app was) without having to go through my home screen. When the student finishes, I use the 4-finger swipe in the opposite direction to pause the recording.


In the end, I have an .mp4 audio file of the student reading in addition to my annotations on the running record. This is great because it's evidence I can use in RTI and parent-teacher conferences, and it also enables me to play back the audio so the student can hear him or herself read -- something that rarely happens. We can then talk about patterns I'm noticing and ways to improve reading fluency. It's a great teaching tool.

Your assignment: Try doing a few running records on your iPad and leave me a comment about how it's going. I'd love to hear other ideas or suggestions to fine-tune this process, too. I've only been doing it for about 6 weeks, so I know there are things that could be improved. Hopefully this is enough information to get you started, though!

Thanks for reading!

Monday, April 8, 2013

Paperless Mission #7: Annotating Rubrics with GoodReader (iPad)

This is the seventh post in my Go Paperless! Challenge Series. If you haven't completed the previous missions, be sure to complete those first.

Also be sure to link up at the Go Paperless! Linky.


Mission #7: Annotating Rubrics with GoodReader (iPad)

I try to give my students high-quality feedback whenever possible, especially on their writing assignments. In the past, it would take me days to grade all of their papers and write hand-write comments on their rubrics. So when I passed those papers and rubrics back to students, it would kill me to see students stuff them into the abyss of their backpacks, or worse -- toss them into the recycling bin. I wanted them to take it home and share it with their parents, and I wanted them to be able to refer back to that feedback. Eventually I learned to photocopy the rubrics before I passed them back, but that still wasn't ideal. It created more paper clutter and one more thing for me to work on organizing.

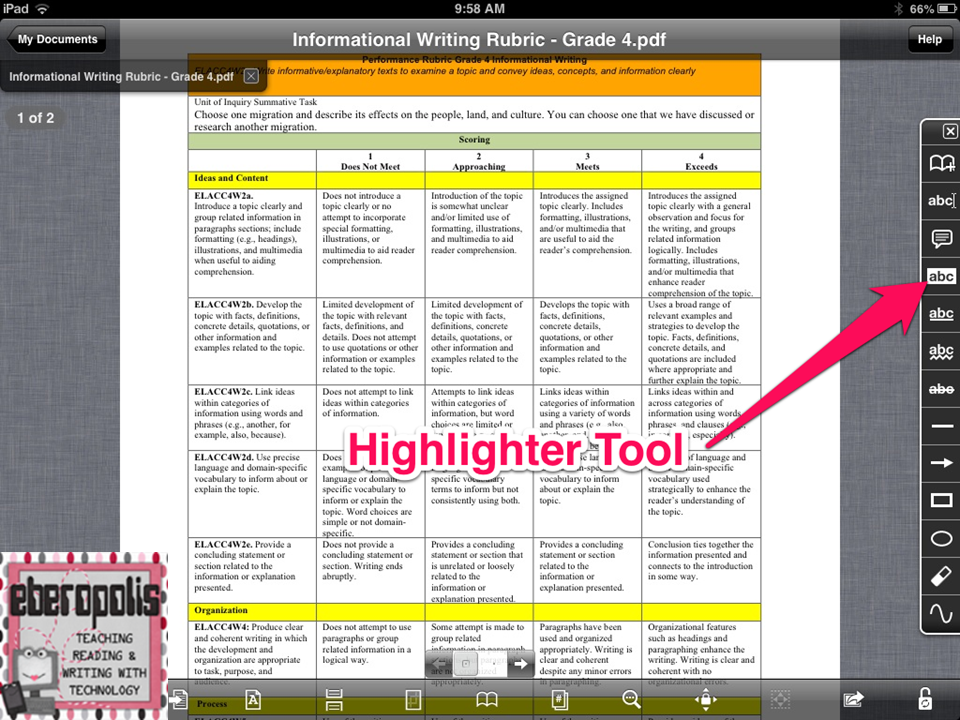
When I say that GoodReader has become one of my all-time favorite apps, I mean it. I now use GoodReader to fill out rubrics and other student feedback. To start, make sure that you have the rubric saved as .pdf in Dropbox. While GoodReader can read any type of document, it will only annotate a .pdf. Then open up the .pdf of the rubric in GoodReader (see previous tutorial).


Choose the highlighter tool to highlight the appropriate categories on the rubric. The first time that you go to annotate a document, it will ask you if you want to save to this file or create an annotated copy. If it's a document that I'm only planning to use once or student work, I typically select "Save to this file." When I'm planning to use the document over and over again, though, I'll create an annotated copy. That's what I'd choose when using a rubric to grade student work.


Once I've made my selection, I'll be able to annotate all over the document. Once you're in the highlighter tool, you can drag your finger over the text that you want to highlight. You can change the color of your highlighter, and you can also delete highlights by tapping on the highlighted area.

At the end of the rubric, I like to type specific comments for my students. To do that, choose the typewriter tool. A little window will pop up for you to type your comments, and then it will save them to the document. If it saves it in the wrong spot, simply tap on the text and a new menu of options will appear.

You can drag and drop the text into the correct space and re-size the text area to get it formatted the way you'd like.


 When you're done annotating the rubric, tap the center of your screen to see the "My Documents" option.

From there, you'll want to rename your file. To do this, select "Manage Files," then tap on the annotated copy of your rubric and select "rename."

Once you've renamed your document, you'll have some options for moving it. First, I send a copy to the student's notebook in Evernote. To do this, tap "Manage Files" again, select your newly renamed document, and select "Open In." A new window will pop up asking how you'll want to save the file. Select "Flatten annotations" because that will preserve your edits and merge it into the document so that you don't lose your work.

Once you've chosen that, another window will open showing which of your installed programs you can open it in. As you can see, I've get several options available. You could also upload it directly to Dropbox if you would like to back up your work there rather than in your student notebook. This might be a good option if you have a folder shared with the student for passing back work.
When I'm ready to hand back the rubric to students, I open it in Edmodo and attach it as a direct message to the individual student. This allows the student and his or her parents to see it. They could also download a copy if they're using a computer. (I've had mixed results with document downloads through Edmodo on the iPad.)

This system has been incredibly helpful for me. It's easy to manage because I don't have to keep track of paper or make sure that I've made enough copies of the grading rubric before I start grading. Just one more step in the quest to curb paper clutter.

What are some other ways you can imagine using GoodReader in the classroom? I'd love to hear your ideas in the comments section!

Wednesday, January 2, 2013

Bump It Up

A while back, I was contacted by a teacher named Sheena about creating a custom order bulletin board for her. I agreed, but when she described what she was looking for, I was really curious. She wanted the title "Bump It Up," some arrows, and a few subheadings saying various things. I was dying to know what it was about, so I emailed her back asking more about it. Fortunately, she was happy to share!

According to Sheena:
The "Bump It Up" board is used to provide students a hands-on opportunity to "bump up" their work. When beginning an assessment piece, you create the learning goal (what students will be able to do) and the success criteria (how they will get there).  I create these things with my students so that it is in their language.  Sometimes I even have them write it out and post the charts they came up with.  In groups, they then create a quick piece that is a level 1, 2, 3, 4.  We use sticky notes and the success criteria to decide what made the piece a level 1, 2, 3, 4.  This board is then displayed as a starting piece for students to refer to as they create their own individual assessment piece on the topic. After I assess their work, I then choose a level 1, 2, 3, 4 and copy this piece without the students' names.  Then I place these pieces in the appropriate places on the board.  The students refer to this throughout the year and see how they can bump their work up to the next level.

The next time around, you can give them examples you have created and have them decide the level and place on the board before going to the final step of using their own work.

At first I was a little worried about the level 1/2's and how they would react to their work being posted, but they actually become very open about it as we always discuss the importance of trying our best and then growing from there.
 Here are a few pictures of how it looks in her class.


Isn't that a fabulous idea?! I'm so thankful for Sheena for sharing that with me. And to say Happy New Year to you, I'm offering it as a freebie this week at Teachers Pay Teachers.


Sheena originally contacted me to make this board after purchasing one of my products on TpT. If you have an idea for a product that you'd like for your classroom, now you can feel free to contact me via my new "custom orders" page. There you can describe what you're looking for and get a quote for how much I'd charge to make it.

Happy New Year!

Friday, July 20, 2012

Friday Freebie: Self-Assessment Posters

A while back I shared this poster from my classroom:


Tonight, it reappeared on someone else's Pinterest board as I was browsing  diligently planning for the new school year, and it reminded me how much I hate the faded marker. So I made some new ones which are now available for free at my TpT store. (You can also click on the image below to get there.)


In the meantime, my classroom is really coming along! I'm so happy to have time to get organized this year. Settling in last year was such a mess...We were moving into a new school and only had 4 days to unpack and set up before the kids arrived. I was also 9 months pregnant and working in 90+ degree heat with unreliable air conditioning and elevator access for my 3rd floor classroom. It was insane! Then I was only there for 3 weeks before going on maternity leave, and by the time I got back, it was hard to make changes.

This year will be SO MUCH BETTER in that regard. I can already feel it, and I'm super excited about it.

I'll share more classroom pics next week. Have a great weekend!

Monday, April 23, 2012

Management & Mentoring Monday: Yes, No, and Sort Of

This will be a relatively quick post because it's late, I'm sick, and it's testing week. Blah.

One of the most brilliant things I ever saw for grading assignments came from one of my mentors, Nell Duke, at Michigan State. What she did was outline 3-5 different objectives that you needed to accomplish in an assignment, and she would phrase them as a question, "Did you...?". When it was time for her to grade the assignment, she'd answer the question with either a "yes," "no," or "sort of." If the answer was "yes," you'd get 2 points. A "sort of" was worth 1 point, and a "no" was worth 0 points.

Grading using this system is amazingly easy once you know what criteria you're going to use, and it helps students know exactly what is expected of them for the assignment.

Here's a free example of a "Yes, No, Sort of" checklist that I used with my students when they were writing book reviews of fiction books on KidBlog.


I know it's not glamorous, but it's free. :)  You can access it by clicking on the image above or clicking here.

In this example, I wanted it to add up to 35 points possible, so I weighted one category higher than the others. In some cases, there wasn't an opportunity to get a "sort of" -- either you turned it in on time, or you didn't, for example. So those were all or nothing point-wise.

We've moved to a different grading system this year, but I still like this way of communicating expectations and assessing student work fairly quickly.

Are there any tools you use in the classroom to make your grading more efficient? Feel free to share your strategies in the comment section below!


Until next time,

Monday, April 16, 2012

Management & Mentoring Monday - Assessing Student Work

Having just temporarily recovered from working on report cards, I thought I'd share a little about a technique I use for grading student work.

Rather than standard letter or number grades, we grade our students on a scale of 1-4. We have specific rubrics for our standards, but they're generally designed like this:

  • A "one" means that even with additional support and scaffolds, the student is not yet successful with the task.
  • A "two" means that the student can do the task with support.
  • A "three" means the student can complete the task accurately, consistently, and independently.
  • A "four" means the student shows a level of understanding that exceeds expectations for fourth grade.
The goal for most students is to get a three.

At the beginning of the year, I introduce this using the terms "novice," "apprentice," "practitioner," and "expert."

(Forgive the faded, gross-looking green marker. I'll be making cuter posters next year...)

We use this poster to talk about the meaning of each term, and I'll regularly have students hold up 1-4 fingers to self-assess at the end of a lesson. It's a good way for me to monitor who is ready to get started working independently and who will need a little more help. 

When it's time for me to grade student work, I can use my district's 1-4 scale, and it lines up fairly well with this self-assessment scale. Usually I can quickly spot-check and tell who is a 1 and a 4 on an assignment; it's just the 2's vs. 3's that take a little longer to decide sometimes. 

Update: Stephanie over at 3rd Grade Thoughts has made posters using this language. Head over to her blog to get her freebie!

What do you use for self-assessing in your classroom? Feel free to share in the comments section below!


Friday, April 13, 2012

Friday Freebie: Common Core Assessment Checklist

I use checklists a lot. They help me see what I need to teach and where students still need some help. Sometimes I will make checklists that assess the class as a whole, and other times, I will use a separate checklist for each child.

I like to break it down into three categories:

Yes - the student shows evidence of mastery
Sort of - the student is close to mastery but still needs a bit of help, or
Not yet - the student is not yet able to master this standard

I've started to work on some assessment checklists for next year with the Common Core ELA Standards for 4th grade, and I wanted to share the one that I've made for Reading Literature.

https://docs.google.com/open?id=0B8y-ZrUhAbCnc05MZ0tUS01SeDJuU0NwU2hYR1B0Zw

Click on the image above to get your checklist.

Do you use checklists? What are some of the ways you use checklists to help you in the classroom? Share your thoughts in the comments section.

Happy Friday!

Related Posts Plugin for WordPress, Blogger...