Showing posts with label GoodReader. Show all posts

Monday, June 9, 2014

10 Must-Have Tools for the Busy Teacher

This year was uniquely challenging for me. I had my biggest class ever (28 students) , and I was co-teaching all day with teachers and paras from the special ed department--also a first. Meanwhile, I started working on my PhD, and my toddler constantly kept me busy. My plate has never been so full!

If you're a teacher who often feels pulled in every direction, then this list is for you. These are my top 10 tools for juggling it all. Hopefully you'll find some to use as well!

1. Nozbe


Nozbe is the ultimate task list manager. You can organize by projects -- school, work, home, etc., create recurring tasks, and so much more. I can access it from any device, add attachments, and email stuff to my to-do list. I started out with the free version, and I quickly upgraded to the paid version. At $96/year, the paid version has a hefty price tag, but this app was SO much better than any other task manager I'd tried, and it's been worth every penny. If you're someone who has lots of projects going at once, this app is worth exploring.


2. Evernote


This is my brain online. All of my coursework and notes are in Evernote, and all of my anecdotal records and student work samples are in here as well. I was able to use the free version for many years, and then once my husband and I decided to go digital with all of our financial documents, etc., I upgraded to the premium version. At $35/year, it's pretty affordable.


3. Dropbox


 I don't think I could function without Dropbox. I switch between so many devices between work, home, and school each day, but Dropbox allows me to keep track of everything. All of my lesson plans, TpT purchases, readings for class, and more are in my Dropbox account. I'm still living off of the free space, but I'm getting the daily reminders that my Dropbox is nearly full. Might need to upgrade that soon, too. Premium accounts offer 100 GB of storage for $99/year.
4. GoodReader


 I've used this app a lot with my students, but I'm finding it to be totally clutch for my grad school stuff, too. I'm doing tons of research for my courses and scoping out dissertation ideas, and GoodReader allows me to annotate all of the PDF's I'm amassing. I've created a folder on Dropbox for all of the articles I've gathered, and I can sync that folder to GoodReader so I can read it all on my iPad. I can also send it back to Evernote when I finish. One of my dear friends told me that I'd have laundry baskets full of research cluttering my house while I worked on my PhD, but not so...It's all electronic!


5. GoogleCalendar

I have a variety of calendars on Google -- class schedules, deadlines, school events, etc. Some of these I share with my husband so we can both be aware of each other's events. Other calendars I share with my students and their parents so they can be aware of upcoming events and tests. I like that all of my calendars are color-coded so I know which calendar I'm looking at, and I can select/de-select different calendars to narrow my focus if I'm looking for something in particular.


6. YouCanBook.Me

This free site allows me to share portions of my calendar with parents so they can schedule parent-teacher conferences. I choose the days they can see, set the times they can schedule, and manage the maximum time blocks they can reserve. They don't get to see any of the events on my calendar, just whether I'm available or not. If they reserve a time slot, it will automatically add it to my calendar and send me an email. It's eliminated the back-and-forth process of conference scheduling and allowed me to manage my time better.


7. Planbook.com

Since I was co-teaching this year, I needed to find a way to share my plans easily from week to week. I tested out Planbook in August, and I loved it. I like that you can extend or bump lessons, attach files, and customize the fields that appear. It's a great resource that's keeping me much more organized. You can get a free trial of it before paying the $12 for an annual subscription.

8. Typinator

This is a tool that's new to me, but Typinator is a text expander tool. There are several pieces of text that I find myself typing or copying/pasting over and over. Typinator allows me to create typing shortcuts for all of those. For example, if I want to type my blog address as a hyperlink when I comment on someone's blog, I can simply type "~bl" and it will place the text there for me. I also use it for standard replies to emails such as when parents email me to say their child will be absent. I can type "~abs" and it will write: "Thanks for letting me know about the absence. I hope your child is feeling better soon! Today's assignments will be posted on our class website, and let me know if there's anything else you need." Four key strokes = all of that. I find typing way faster than using the mouse, so this is a time saver that quickly adds up. It's only available for Macs, and it's priced in Euros (converts to around $36 US), but I use it all the time.
9. GoodReads


Distinct from GoodReader, GoodReads is an online community surrounding books. It allows me to keep track of the books I'm reading and which books I want to read next. As I'm starting my dissertation research, I'm constantly finding book titles that I want to check out. Similarly, there are lots of teaching books and children's books that I want to investigate someday, and GoodReads helps me organize all of that. Best of all, I can use its scanning feature to scan barcodes when I'm browsing in the bookstore.

10. Edmodo

I used Edmodo a lot for collecting student work and grading tests/quizzes this year. It managed all of the submissions and kept the work organized for me so I could be more efficient with tracking these things. It also allowed me to create assignments, give and grade quizzes, communicate with students and parents, and so much more. This is a great free learning management system that was a centerpiece of my classroom this year.


With the exception of Typinator, which is only on my computers, all of these apps are cloud-based or mobile-friendly so I can get to them from any device. When I'm shifting between my iPhone, iPad, laptop, and desktop, that's critical. I may be busy, but I can get to my projects anytime, anywhere, and I'm not hauling around tons of materials everywhere I go. These tools boost efficiency and minimize life clutter.

What are some tools you're using this year to help with productivity? I'd love to hear more recommendations in the comments.


This post contained some affiliate links meaning that if you click on the link and purchase the app, a small part of your subscription cost will go to me instead of entirely to the company. I'm only recommending products that I highly use and pay for myself, however, and I hope you'll find value in these resources as well. 

Sunday, June 30, 2013

Tune Into Technology Linky: Integrating Technology into Reading

I'm excited to be linking up with iTeach 1:1 and Learning to the Core for their new series Tune into Technology. This week's topic is Integrating Technology into Reading, so I wanted to share 5 strategies I use to do this.

1. Let kids annotate their reading with GoodReader.


I've talked about this app before, but it's one of my favorites. GoodReader allows you to annotate pdf documents. I use it for almost all of my professional reading, and I've converted several documents into pdfs for my students as well. It's a fantastic tool because my students are able to leave "think marks" all over their reading, and I don't have to worry about them writing in a book or leaving sticky notes everywhere. We've even developed our own codes for how to use the annotation tools.


2. Share favorite books on KidBlog.


My students LOVE sharing the books they're reading on KidBlog, and they especially love reading and commenting on each other's blogs. I've talked more about how we do this in a previous post.

3. Create Book Trailers in iMovie.


Some of my students began doing this for fun at the end of the school year when we became a 1:1 iPad classroom, and I will definitely be doing this more next year. iMovie has some great templates built-in for this, and my students loved being able to share their favorite books through this medium.

4. Create book clubs and discussion groups on Edmodo.


We started using Edmodo at the end of the school year, and it was a great way to get conversations started or keep them going about the books we were reading in class. You can read more about getting started with Edmodo in my paperless series here.

5. Use Evernote and GoodReader to assess reading.


I use the running record templates from the Reading & Writing Project at Teacher's College. Because they're pdf files, I can annotate them in GoodReader, and I can record students while they're reading in Evernote. I've written a complete tutorial on how to do this here.

How do you integrate technology into reading instruction in your classroom? I'd love to hear your ideas. And be sure to link up with the Tune into Technology linky!

And don't forget to join us for the Southeastern Blogger Meet Up. Click the button below to get the details and RSVP!


Tuesday, May 7, 2013

Paperless Mission #8: Conduct and Archive Running Records (iPad)

This is the eighth installment in my Go Paperless! Challenge series. You can see the other entries in the series here. Also be sure to link up with my Paperless Challenge Linky!

Mission #8: Conduct and Archive Running Records 

At least once each six-week term, teachers at my school are supposed to conduct a running record as a guided reading level assessment. We use the Fiction Level Reading Assessments provided by the Teacher's College Reading and Writing Project, and before my move to paperless, this system was a mess for me. I'd have one binder that was all the student copies of texts, and then I'd have a huge paper pile of blank assessments that I could fill in as I worked with students. Invariably, I'd have a ton of kids reading on level S, for example, and I'd run out of my copies of that assessment, so it was back to the copier to make more. Then I'd have to deal with recording the data and filing them all, and it was a bit of a nightmare.

Paperless rocks. The nightmare is over.

In this tutorial, I'll share how I'm using Dropbox, GoodReader, and Evernote to conduct running records anytime and anywhere on my iPad. You might want to get a good iPad stylus, too, if you like that "pen in hand" feel.

Step 1. Download all of the running records to a folder on Dropbox.


You will also want to print one student copy of each assessment. I still keep all of those in page protectors in a binder so I can hand one over for the student to read off of, but I never make copies of these. It's a one-time paper expense that I'm happy to live with.


Step 2. Import the guided reading assessments into your GoodReader app.

Once you're done saving them to Dropbox, open up GoodReader and connect to DropBox. There's more information about this in the previous GoodReader tutorial, Mission #6.


Step 3. Choose the appropriate level, and open up the teacher copy in GoodReader.

The first time that you want to annotate the document, you'll be prompted to "Create an Annotated Copy" or "Save to This File." You will want to choose "Create an Annotated Copy" so you don't lose your blank copy. Otherwise, you'll have to download these files every time you want to use them, and that's only marginally better than running to the copy room -- trust me.


Step 4. Use the annotation tools to mark up student reading as you normally would. 

I won't lie -- the first couple times I did this, it felt a little awkward. You have to remember to save the document if you're switching between tools or trying to scroll/resize. But it does get better quickly, I promise! The more you use the tools, the more fluid your movements will be. It didn't take me long to get back to the level of proficiency I had with paper copies, and while my writing is a little messier on the iPad, it definitely gets the job done.


Step 5. Rename the file using the manage files option on the home screen of GoodReader. 

To get back to the home screen, tap the center of your screen -- away from any annotations -- and it should show you the main menu or "My Documents" up at the top left.


Step 6. Move the renamed running record over to the student's notebook in Evernote.

To get there, go into Manage Files again, and then select Open in. . . 


You'll be prompted to flatten annotations. Make sure you choose this or your annotations may be lost. 


Select Evernote, and it will launch your Evernote app. From there, you can move it into the appropriate notebook and type in any notes that you want to remember about the student's reading.


Extra Credit: Create a simultaneous audio file in Evernote.

This is something that I've been playing around with lately, and I think the possibilities for this are amazing. Once I have everything set up so that my student has the student copy of the text and I have the right running record file open in GoodReader, I go into Evernote, open a new note, and start an audio recording using the microphone icon. I tell the student to start, and then I use 4 fingers to swipe quickly from right to left across my iPad. This takes me back to GoodReader (or whatever my last open app was) without having to go through my home screen. When the student finishes, I use the 4-finger swipe in the opposite direction to pause the recording.


In the end, I have an .mp4 audio file of the student reading in addition to my annotations on the running record. This is great because it's evidence I can use in RTI and parent-teacher conferences, and it also enables me to play back the audio so the student can hear him or herself read -- something that rarely happens. We can then talk about patterns I'm noticing and ways to improve reading fluency. It's a great teaching tool.

Your assignment: Try doing a few running records on your iPad and leave me a comment about how it's going. I'd love to hear other ideas or suggestions to fine-tune this process, too. I've only been doing it for about 6 weeks, so I know there are things that could be improved. Hopefully this is enough information to get you started, though!

Thanks for reading!

Monday, April 8, 2013

Paperless Mission #7: Annotating Rubrics with GoodReader (iPad)

This is the seventh post in my Go Paperless! Challenge Series. If you haven't completed the previous missions, be sure to complete those first.

Also be sure to link up at the Go Paperless! Linky.


Mission #7: Annotating Rubrics with GoodReader (iPad)

I try to give my students high-quality feedback whenever possible, especially on their writing assignments. In the past, it would take me days to grade all of their papers and write hand-write comments on their rubrics. So when I passed those papers and rubrics back to students, it would kill me to see students stuff them into the abyss of their backpacks, or worse -- toss them into the recycling bin. I wanted them to take it home and share it with their parents, and I wanted them to be able to refer back to that feedback. Eventually I learned to photocopy the rubrics before I passed them back, but that still wasn't ideal. It created more paper clutter and one more thing for me to work on organizing.

When I say that GoodReader has become one of my all-time favorite apps, I mean it. I now use GoodReader to fill out rubrics and other student feedback. To start, make sure that you have the rubric saved as .pdf in Dropbox. While GoodReader can read any type of document, it will only annotate a .pdf. Then open up the .pdf of the rubric in GoodReader (see previous tutorial).


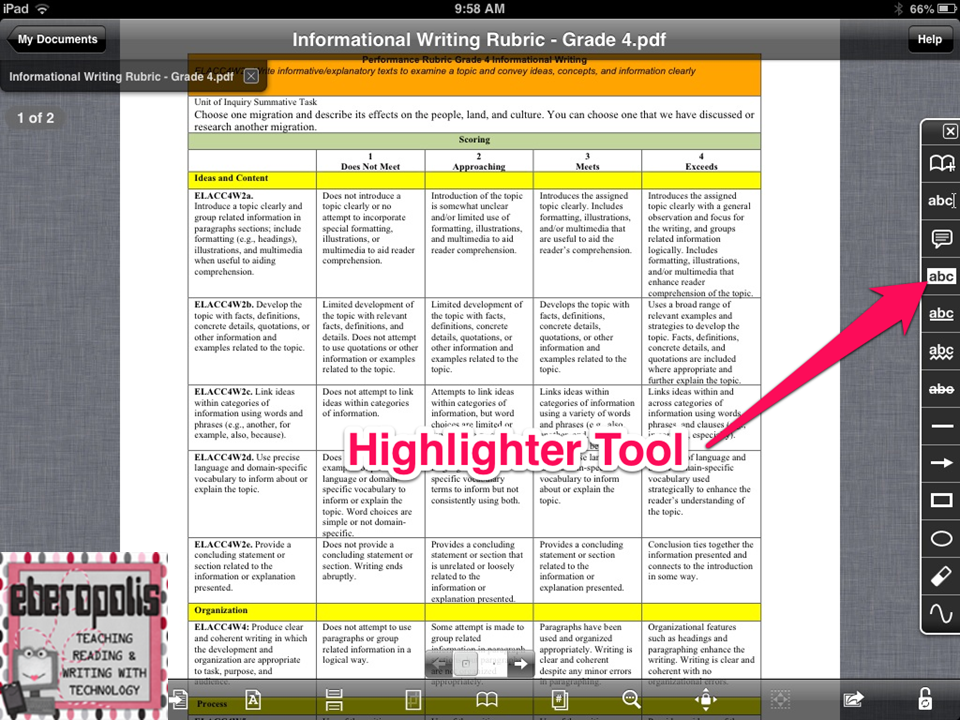
Choose the highlighter tool to highlight the appropriate categories on the rubric. The first time that you go to annotate a document, it will ask you if you want to save to this file or create an annotated copy. If it's a document that I'm only planning to use once or student work, I typically select "Save to this file." When I'm planning to use the document over and over again, though, I'll create an annotated copy. That's what I'd choose when using a rubric to grade student work.


Once I've made my selection, I'll be able to annotate all over the document. Once you're in the highlighter tool, you can drag your finger over the text that you want to highlight. You can change the color of your highlighter, and you can also delete highlights by tapping on the highlighted area.

At the end of the rubric, I like to type specific comments for my students. To do that, choose the typewriter tool. A little window will pop up for you to type your comments, and then it will save them to the document. If it saves it in the wrong spot, simply tap on the text and a new menu of options will appear.

You can drag and drop the text into the correct space and re-size the text area to get it formatted the way you'd like.


 When you're done annotating the rubric, tap the center of your screen to see the "My Documents" option.

From there, you'll want to rename your file. To do this, select "Manage Files," then tap on the annotated copy of your rubric and select "rename."

Once you've renamed your document, you'll have some options for moving it. First, I send a copy to the student's notebook in Evernote. To do this, tap "Manage Files" again, select your newly renamed document, and select "Open In." A new window will pop up asking how you'll want to save the file. Select "Flatten annotations" because that will preserve your edits and merge it into the document so that you don't lose your work.

Once you've chosen that, another window will open showing which of your installed programs you can open it in. As you can see, I've get several options available. You could also upload it directly to Dropbox if you would like to back up your work there rather than in your student notebook. This might be a good option if you have a folder shared with the student for passing back work.
When I'm ready to hand back the rubric to students, I open it in Edmodo and attach it as a direct message to the individual student. This allows the student and his or her parents to see it. They could also download a copy if they're using a computer. (I've had mixed results with document downloads through Edmodo on the iPad.)

This system has been incredibly helpful for me. It's easy to manage because I don't have to keep track of paper or make sure that I've made enough copies of the grading rubric before I start grading. Just one more step in the quest to curb paper clutter.

What are some other ways you can imagine using GoodReader in the classroom? I'd love to hear your ideas in the comments section!

Monday, April 1, 2013

Paperless Mission #6: Setting Up GoodReader (iPad)

This is the sixth post in my Go Paperless! Challenge Series. If you haven't completed the previous missions, be sure to complete those first.
Also be sure to link up at the Go Paperless! Linky


Mission #6: Setting Up GoodReader (iPad)

As I've mentioned before, I work off a lot of devices. I'm in a 1:1 iPad classroom, but even before my students had access, I had an iPad of my own that I used constantly. I liked having it handy for anything that I was working on, and once I learned about GoodReader, my love for the iPad grew tremendously. I've shared some love for GoodReader before, but GoodReader is the ultimate document reader for the iPad. It allows you to read any type of document and annotate over .pdf files. It also syncs with a variety of other apps, allowing you to pull and read all of your important documents into one place.

Once you have your important documents organized on Dropbox, open up the GoodReader app on your iPad. Here, you'll be able to connect GoodReader to your Dropbox account. To do this,


My documents list already has some items and folders listed, but yours will likely be empty. The left column shows all of the folders and documents you have saved in GoodReader (and could therefore access without an internet connection). The right column has all of the utilities for GoodReader. Today, we're going to focus on the one towards the bottom -- "Connect to Servers." 

When you click on the "Add" button, you'll be able to see the many, many connections GoodReader can make. Here are a few highlights:
  • Popular Mail Servers (GMail, Hotmail, etc.) - this connection doesn't grab all of your emails, but it will allow you to see any messages that have an attachment. This is great for when you're at a meeting and somebody sends out some documents you need.
  • Dropbox - you can read all of the files that you've saved there.
  • Google Drive - view any type of Google Drive file that you have -- from spreadsheets to presentations to documents.
The connection set-ups are fairly intuitive. You will need to name each set up (On some screens that shows up as "Readable Title;" I named mine based on what I was connecting to), but then you simply enter your username. You can also enter your password, in which case it will be saved to the device and you won't have to enter it again, or you can log-in each time you want to access a document.

As you can see from my left column, there are a few folders that I've downloaded straight to GoodReader so they'll always be available to me. These are folders that I'm constantly using and want easy access to. I also have it set up so that they'll automatically download updates to those folders whenever I add more documents to my Dropbox account. 

Once the folders are set up in GoodReader, you can read the documents, but you can also annotate over .pdf files. I use that feature a lot on my curriculum documents, and I've also started doing all of my running records and reading assessments on my iPad. Here's an example that shows you the annotation tools in the document viewing pane:


I keep my annotating toolbar pinned on the right side, and there you can see a variety of annotation options that are available -- typewriting text, creating "sticky notes," highlighting, underlining, drawing boxes, arrows, etc., and the last option is the freehand tool. I use this for running records with a stylus.

One of the best things about GoodReader is that it works well with other apps. Once I finish annotating a document, I can send it to other apps such as Evernote or Dropbox  from the original "My Documents" screen.


How I Use It

This is one of my must-have apps because of the broad range of ways it can be used:

  • Turn your iPad into a second computer monitor -- When I'm using lots of curriculum documents to write unit plans, I can leave it open in GoodReader with all of my notes and highlights while I work on my laptop or computer. No more switching between screens on my computer. (Am I the only one who finds that annoying sometimes???)
  • Highlight standards that you're focusing on each term without having to print out (or lose) new documents all the time.
  • Annotate rubrics, running records, and other types of student work
  • Use with students to create paperless assignments

I'll be posting more in-depth tutorials about how to do all of these in future installations of this series, but for now, your challenge is to begin exploring GoodReader. Then, in the comment section, share a bit about how you think this app could be useful.

Spring break starts next week for me, and I can't wait! I will try to get another installment posted this week, but I make no promises. It's the end of the term, and that's always a super-busy time with report cards and grading. I must say, however, that I'm more organized than ever going into this given how much less paper I'm using!

Have a great week!

Monday, March 4, 2013

Paperless Mission #1: Gather your Tools

This is the first post in the Go Paperless Challenge! If you're participating, be sure to link up at my initial post. (We'll have other linky's along the way to do some progress updates as well...)


There are a few tools that you'll need to prepare to Go Paperless! Here's what I'll be using:

Evernote

I've shared my love for Evernote in the past, but this is a tool that has so many features and so much potential. It can be accessed from any computer or mobile device, and it allows you to save notes, pictures, audio recordings, and more into cloud-based, password-protected notebooks. If you haven't signed up for an account yet, you should sign up at Evernote's website. Accounts are free, but there is a premium version available. As you're starting to go paperless, I would hold off on getting the premium account. I've had a free account for a few years, and I haven't ever maxed out my uploads, although I expect that to change as I start to use the service more. Still, at $45/year, the subscription service is a steal.

Dropbox

Dropbox is an online file hosting server. A basic (free) account will give you 2GB of storage, and there are ways you can expand your storage by connecting to your Facebook page, following @Dropbox on Twitter, etc. You can also earn 500MB for each friend you refer. If you use my link to sign up, you'll get the extra space as well. They have paid accounts available for up to 500 GB, but I haven't needed to use that...yet.

I use Dropbox to store all of the files that I would want easy access to. The beauty of Dropbox is that it allows you to access your files from any computer or mobile device, and for someone who switches between computers and mobile devices constantly, I appreciate how easily I can access my work.

GoodReader

This is one of the few services that you'd have to pay for as it's a paid iPad app ($4.99), but honestly, this is probably the best paid iPad app I've used. This app allows you to read and annotate pdfs, webpages, and other documents on your iPad. One of the best things about it, though, is that it integrates well with other sites like Google Drive and Dropbox. Even if you only have one iPad in your classroom or just an iPad for yourself, I would highly recommend this app.

Edmodo

If you're planning to have your students complete assignments digitally or turn in their work online to you, this is a great platform. You can create groups, calendars, assignments, and quizzes in a secure teacher-moderated environment. Did I mention that this service is free and works on any computer or mobile device? I'm an Edmodo-newbie, but my district is going to be switching over to using Edmodo, and I'm excited to be learning about it. I'll share all of the tips and tricks that I learn along the way. 

Your Mission

If you haven't signed up for or tried out any of these services, then this is a good place to start. I'll be writing tutorials over the next several days and weeks that use these tools as I begin to go paperless. 

Have you started to cut back on your paper clutter? What other tools are you using? Be sure to share in the comments section!
Related Posts Plugin for WordPress, Blogger...