Showing posts with label Google Sites. Show all posts

Tuesday, August 7, 2012

Technology Tuesday: Special Features for Google Sites

Off and on this summer, I've been sharing some info about setting up a Google Site for your class website. (Click to read part 1, part 2, and part 3). Today I'm going to share two of my favorite add-ons that I've incorporated into my class website.

Add-on #1: Feedburner

What it is: Feedburner is a service managed by Google that allows you to create an RSS feed for your website. Just like you might receive updates that a blog has been updated, parents could receive updates that your website has been updated. Even better, there's a way for parents to subscribe and receive emails about updates that have been made to your website.
How I use it: I have a page on my class website called "Homework & Announcements" that I update every afternoon with the day's learning targets, homework assignments, and any important announcements. At the top of the page is a "subscribe" button where parents can sign up and automatically get an email every day with the information I've posted. It keeps parents in the loop, and it requires very little effort on my part.
Why it rocks: Feedburner allows the site owner to go in and manage the subscriptions so I can see which email addresses have signed up and which ones haven't. That way, I can know who is getting the information and who may need other forms of communication. I can also manually unsubscribe parents when their child moves on to the next grade so I don't have to worry about inundating them with irrelevant information. 
How to get started: Go to feedburner.google.com.

Add-on #2:YouCanBook.Me

What it is: YouCanBook.Me is a free service that integrates with your Google Calendar to allow parents to schedule conferences and meetings with you according to the parameters you set.  When parents go to my website and click on a link, they see an image that looks like this:


Parents can choose from any of the blue time slots according to their schedule. They'll then fill out a quick form so I know who I'm meeting and what they want to talk about, and that's it. From there, I'll receive an email alerting me that a conference has been scheduled, and the conference will be automatically added to my calendar for me. The service also sends a reminder email to the person who booked the conference so they don't forget they've scheduled it.
How I use it: Let's say that I'm generally willing to conference after for an hour or two after school on Tuesdays and Thursdays, and I'm willing to stay for one conference on Fridays. But then my daughter has a doctor's appointment one week, and I have family coming into town another week, so I won't be able to stay after school for conferences. Sounds like a lot to keep track of, right? Wrong! This service reads everything you have on your schedule and only shows the times you have available. It also lets you set other parameters such as the length of the conference (I schedule 30 minute blocks), and how much notice you need (I require at least two days notice for conferences booked through this site). I can also block off ranges of dates. This year, for example, I'm not letting any parents schedule a conference until we've been in school for at least two weeks. That way, I'll have an opportunity to get to know the kids and catch my bearings on my new class before I have to worry about parent-teacher conferences.
Why it rocks: I no longer have to send emails back and forth with parents trying to figure out a time that will work for both of us. If we need to schedule a conference, I just refer them to the link on my website and ask them to pick a time that works for them. It's a real time saver. I also like that it sends out automatic reminders to the parents and me so I don't have to worry about it. If the parent realizes the time no longer works, there's a link in the reminder email that will allow them to cancel -- automatically removing the appointment from my calendar and emailing me that the meeting has been canceled. It honestly couldn't be easier. And did I mention that the basic version is free?
How to get started: Go to http://youcanbook.me to register. 

Do you have any other time-saving tips that help you communicate with parents? I'd love to hear them! Share your thoughts in the comments section.

Wednesday, July 18, 2012

Technology Tutorial: Adding Google Apps to your Google Site

This is week 3 in my summer series about building an awesome class website using Google Sites. Be sure to read Week 1 and Week 2 as well!

Part 5: Entering the World of Apps

As I'm sure you've guessed by now, I'm a big fan of Google, and I use Google Apps for everything. I have a gazillion different calendars that I use to track different things. I host almost all of the documents I use through Google Docs (now becoming Google Drive...). I use GMail, Google Reader, the list goes on... So one thing that I particularly like about my Google Site is that I can integrate many of those features into my class website. Today I'll share two examples -- my class calendar and a class form.

The Calendar Tool

One of the class tools that I feature on my website is a class calendar. I record every school event that I know of on this calendar (birthdays, curriculum nights, project due dates, tests, extra curricular practices, etc.). It helps keep me organized and it keeps the parents informed about what's going on. It's also helpful because anytime I make a change to my class calendar, it will automatically update on the website. Here's a preview of what my class calendar looks like on the website:


To get started, you'll need to have a Google Calendar already created. Then, click on the add page button.


You'll get a screen that looks like this. You won't need to change any of the settings.


Once your new page is created, go to Insert and choose Calendar. Find the name of your calendar, and that's it! It will automatically appear on your Google Site!

Google Forms

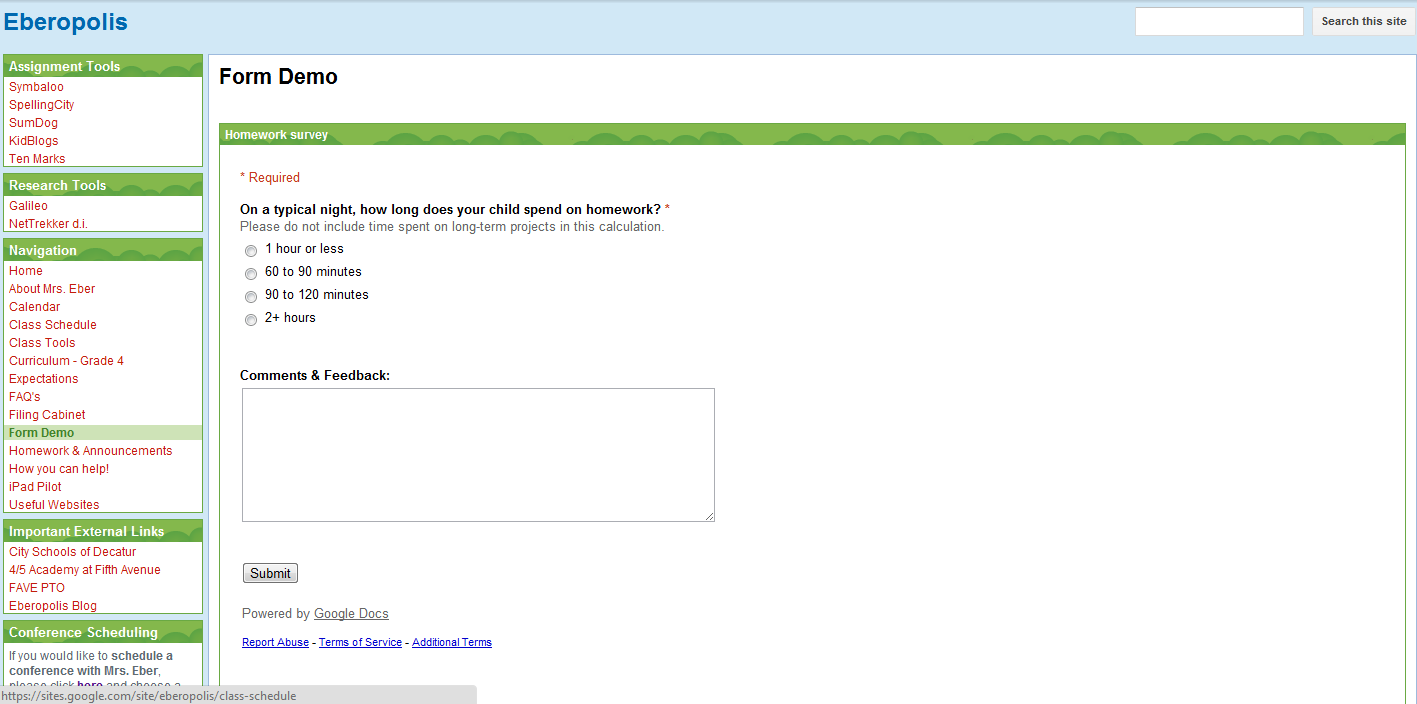
Adding a Google Form is also easy. First, you'll need to go into Google Drive and create a form. (If you don't know how to create a Google Form, there are lots of great examples and tutorials on the web!) Once your form is created, you can either add a new page to your Google Site like we did for the calendar, or insert the form into an existing page. To insert the form, click Insert > Spreadsheet Form and then choose the form you'd like to add from the list of your Google Forms. Once you're done, hit Save. Your form will now appear on the website as something like this: 


In the past, I've used Google Forms for student and parent surveys, data collecting, quizzes, and more. I'll share some specific examples of these tools in future posts, but I wanted to show you how easy it is to integrate some of the Google Apps into your website as you're building a Google Site.

What are some of the ways you could use calendars or Google Forms in your classroom? Please share your ideas in the comment section!


Wednesday, June 27, 2012

Technology Tutorial: Adding Pages to Your Google Site

This is Week 2 in my summer series about building an awesome class website using Google Sites. You can check out Week 1 of the series HERE.


Part 3: Types of Pages

When you add a page to your Google site, you're given four different options. 

Option #1: Your basic webpage
This is just your traditional page that could include text and links to other subpages. Here's an example of a page of my website that uses this option:


Clicking on any of the red text hyperlinks will just take you to another subpage within my website. When you get further into my website, the links might take you to external sites such as games or readings that support the concept I'm teaching. Regardless, this option is the one that I use 95% of the time when I'm adding new pages to my Google Site.

Option #2: Announcements
This is a lot like a blog-feature for your website, but without a lot of bells and whistles. It's a page that you can update frequently, and the most recent update will appear at the top of the page. For my class website, I use this type of page to post homework and announcements.


Option #3: File Cabinet
This option is a way for you to upload files and make them available to others to download. I have a page of my website simply called "Filing Cabinet" and it's where I'll upload any of the frequently used pages that students are likely to need or misplace (e.g., reading logs, spelling contracts, extra grid paper for a math assignment, etc.). You can organize the contents into folders, add descriptions, and automatically leave info about what version it is (if you replace a file, for example) or when you uploaded it so parents can see recent additions. I love this page because it really eliminates a lot of homework excuses.


Option #4: List
I'll be honest -- this is a feature that I've never used. The description says that it lets you make and organize pieces of information (lists!), but I've never had a situation where I really needed to do that on my website. Perhaps it would be good to use if you were organizing a field trip or something like that.

Part 4: Organizing Your Site

When you first set up your website, you'll just have a Home Page -- at least, that's the case if you use a blank template. From there, each additional subpage that you add will either be nested at the top level, or you can choose to nest it under something else. Here's an example.


When you look at the Navigation side bar on my website, you can see several subpages listed. 
These are all of the pages that I've created at the "Top Level" because I thought they should be easy to find and I wanted it to be fairly easy to navigate. I put all of my most important or big topic pages as "Top Level." The only exception is "Biography Project Choices" -- which is only listed there because I wanted my students to find it immediately for an in-class activity. 


If you click on "Curriculum - Grade 4," however, you can see the subpages that I've nested beneath it listed at the bottom of the "Curriculum" page.


To do that, I just click "Put page under Home" and then select the option "Choose a different location" when I'm adding a new page. This will show you all of the top level and subpages you've already created.


One of the things that I really like about the site is that no decision has to be permanent. If you want to reorganize your site -- something I'll do with mine this summer -- you can always move pages around. Just go to the page, click "More" along the editing options at the top, and then choose "Move Page" and it will take you to a menu just like the one above. It's very easy to organize and re-organize in that way, and it will update all of your links automatically.

Homework :)

If you're working on starting your own Google Site this summer, play around with the different types of pages. Try to create a curriculum page, an announcement page, and a filing cabinet. You are welcome to check out my website if you need ideas, but just remember that it's a work-in-progress. In fact, I think classroom websites are always a work-in-progress. I'm constantly adding links to new resources I find or reorganizing it to better suit my class and my instructional needs. Don't feel like it needs to be "100% done" before you share it because honestly, you'll probably never reach that point. Some information is better than none.

What features do you want to include or already use in your classroom website? Please share some of your ideas in the comment section as I would love to hear them!

Tuesday, June 19, 2012

Technology Tutorial Tuesday: Getting Started with a Google Site

For the next several weeks, I'll be devoting my Tuesday tutorials to talk about building an effective classroom website using Google Sites. After all, there's no better time than the summer to work on building your class website!


Part 1: Why websites matter

I'm not sure what it's like in your district, but there's a pretty large range of quality for classroom websites at all the places that I've ever taught. There are some teachers who update their websites regularly, and then there are others who work on their website for the couple hours devoted to staff website development on a professional learning day, and then never go back. This is unfortunate because having a great classroom website can be a huge plus for communication and classroom management. For me, my classroom website serves 3 important purposes:

1. It makes all of my technology lessons run effectively in the classroom. Given how much we use technology in my classroom, it helps if my students can go to one central website and get links to everything they need for the day's lesson. Sure, I still teach them how to do good web searches, but if I know a particular site that they need to use that day, I'd rather have them click a link than search for the site or try typing in the http address on their own. 
2. It facilitates communication with parents. I can give parents all of the information they need about homework, upcoming assignments and events, special requests, and curriculum in one easily accessible spot. As a side note, having a high quality classroom website can help make a good first impression when the parents invariably Google you before your back-to-school meet and greet. ;-)
3. It signals to the larger community that you're organized and competent. When I was job-hunting from out of state a few years ago, one of the biggest things I used to form my impressions about schools was their school and class websites. I narrowed my list of possible schools to apply to from that information alone, and I know from talking to other teachers recently hired in my school, they did the same. From a recruitment perspective, high quality websites can make a lasting and positive impression -- especially on new teachers.

Part 2: Getting Started

A couple of years ago, after a long story catastrophe that ended in me losing my class website, I decided to start over and move to Google Sites. Now, I will never use anything else. (And when my district eventually insists that I have a FirstClass website, I might humor them by making a Home page on FirstClass that links to my Google site...). Google Sites are very user-friendly, easy to edit, and they have a lot of features that I haven't seen matched by any other site -- particularly for those of us who are not great with coding HTML.

Here's a short (1 minute) introductory video from Google that overviews Google Sites.


To start building your own class website, you'll need a Google account. Then go to http://sites.google.com. Once you are logged in there, you'll see a screen that looks like this:


The first thing you'll want to do is select a template. There are two good options:


Option #1: Classroom site, which will pull up a page that looks like this:


It already has many of the common features you'd want on your website. You would just click the pencil icon toward the top of the page to edit the text and replace it with your own information. It's very user-friendly.

Option #2: Blank Template, which is a little more complicated than the pre-made template, but it's still pretty easy to navigate. This is the option I chose for my website because I wanted my site to be more personalized and less cookie-cutter. Either option is a good one to work with. Here's what the blank template has become on my classroom website (you can click on the image to go to my actual classroom website):

Once you've chosen a template, you can name your site and select themes to play around with the look of your site. Don't worry if you haven't decided on a look just yet --  you'll be able to go back and change themes later if you'd like.

Once you click "Create," you're done. You'll have your own website! Take some time to play around with the features and explore how the site works. Also think about what kind of information you'll want to include on your class website. Next week, we'll talk about adding pages and subpages and organizing your website. In the meantime, you're welcome to explore my class website, and I'd love to check out yours! Please leave a link to your class website -- no matter what stage it's in -- in the comments section so we can share ideas and resources.   

Saturday, August 13, 2011

iPads + Google Site + Google Forms for the win!

I have a pretty sophisticated Google Site that I've built over the last three years for my classroom, and I use it daily for instruction and parent communication. Many of the activities that I ask my students to do online are connected through this site in some way, so I wanted to make sure that it would be compatible user-friendly with the iPads. Here's a tutorial on how to access such a frequently visited website with students and some of the special features such use could create.

Step 1: Go to the website.
In this instance, my website is located at sites.google.com/site/eberopolis.


Step 2. Click the button immediately to the left of the browser bar, and select "Add to Home Screen."


Step 3. Find the new icon for your webpage as the last icon on your last page of apps.


4. Hold your finger on the icon until the page of icons begins to shake and they have the "x" symbol in the upper left corner of each icon.


5. Drag and drop the website icon into the bar at the bottom of the screen.


6. Press the home button to save your changes and stop the apps from wobbling.


The shortcut will now appear in the bottom row regardless of what page of apps the students are on.

One thing that I love about Google is the ability to create forms through GoogleDocs. I can create assignments that include fill-in-the blank, multiple choice, check box, short answer and long answer type questions. I can make some questions required and other questions optional. I can then link the form to my website, and students can answer the questions and submit their responses to me electronically.
Here's an example of a Google Form that's already linked to my website:

All of their responses are sent to me in a spreadsheet which gets updated in real-time. It's great for quick assessments as well as projects that students have a larger window of time to complete. I also like to use Google Forms for parent surveys on my website.

I tested out my Google Form using the iPad, and it was very easy to use. This will definitely be a tool that I incorporate into future assignments. I'm also thinking that I may design a quick parent survey for curriculum night, and let the parents answer the survey using the iPads.
Related Posts Plugin for WordPress, Blogger...