Showing posts with label back to school. Show all posts

Saturday, August 17, 2013

Back to School - Math Edition

It might be time to think about renaming my blog, because I'm really excited about teaching math this year! It all started when I read the book Number Talks over the summer.

I've always understood the importance of mental math and computation strategies, but I'd never really understood how to teach it. It felt like something kids either had or they didn't. This year, however, I decided that we'd start doing number talks from day #1, and I'm already blown away by how my students are developing as mathematical thinkers. They're able to solve complicated addition problems in their heads -- no paper allowed -- and they're articulating their strategies well. I've been introducing a new strategy every 2-3 days, and it's been awesome. We'll be moving on to subtraction strategies in a few days, and I have high expectations for that to.

To help students with the mental math strategies, I made a set of posters that describe each strategy with an example of how it works. There are 20 posters in all -- one for each strategy described in the book.


The complete set is available in my TpT store, and they'll be on sale for 28% off this weekend as part of the Teachers Pay Teachers back to school sale if you use the code BTS13.


As I've been working on order of operations and number sense with my fourth graders, I also introduced the four fours problem. The premise of the problem is this:

Using some arithmetic combination of four 4's, can you write an equation for each of the numbers from 1-100? Here are the rules:
  • You may use any combination of addition, subtraction, multiplication, and/or division
  • You may combine numbers, e.g., use 2 of the fours to make the number 44
  • You may insert decimal points
  • You may use a four as an exponent
  • You may use square roots
  • You may use factorials, e.g., 4! is equivalent to 4 x 3 x 2 x 1 = 24
  • You may use overbars to make a decimal repeat
  • You may NOT use any digit other than a four
  • You MUST use all four 4's in each solution

Before I go on, let me give two caveats. 1) I didn't expect all of my students to be able to handle all of these rules. Square roots, exponents, and factorials are WAY above my fourth graders heads generally, but I did have a handful that could handle it. And there are plenty of solutions to be found that don't require those operations. 2) This problem freaked out the parents more than it scared the kids, I think. I had a few panicked parents that I had to talk down while we were working on this, but in the end, it was well worth it. My students were so excited about math and problem solving as we worked through this problem. It was homework each night to try to find a few more solutions, and then we'd add to a chart during math class. Look at all that my students accomplished after just two days!


We've filled in a bunch more solutions since then, but of course I left my camera at school this weekend...

Finally, in honor of the big back to school sale on TpT, I've bundled four of my favorite math resources into a back to school math pack for this weekend only. 


Sold separately, this is $17 worth of products that I'm selling this weekend for $10, but after Monday, the bundle will no longer be available in my store. So if you've had any of these on your wish list...

Hope everyone had a great week! I'm still learning how to juggle grad school with teaching, but I'm hopeful that I'll still be posting at least once a week.

Off to start catching up on blog reading and filling my cart for the TpT sale! Have a great weekend!

Monday, July 29, 2013

Preparing for a Paperless Year!

I am in full-blown pre-planning mode. We officially reported back to school on Thursday, and I'll have 27 fourth grade students in my classroom on August 1. It's crazy to think about how fast this summer has gone and how much work is still ahead.

This will be the first year that I will attempt to go paperless from day 1. Last year, we only had 1:1 iPads for the last 6 weeks of school, so it was after we had established many of our routines and procedures for the year. As I prepare for this shift, I'm linking up with the Tune into Technology linky to share my plans for management and organization.

Managing the Students

1. Number the technology
I assign students numbers 1-27 on the first day of school. We use these numbers for everything -- mailboxes, book bins, lining up, etc. We'll also use them for the iPads. Each student will be assigned the iPad corresponding with their number, so they'll always know which one to use and which slot to put it back in when we clean up.

2. Build Classroom Norms and Routines
We'll develop some essential agreements about the iPads before we even get them out. I'll let the students decide on the rules, with a little extra guidance as necessary. The items that we'll need to touch on will include:
  • how to get the iPad out of the cart
  • moving around the classroom with the iPad
  • using the iPad appropriately (following directions, etc.)
  • putting the iPad away
You can read my previous posts on this here and here.

3. Develop a common vocabulary for the buttons and gestures, and teach some basic actions.

We'll talk about the different buttons on the iPad and their functions. We'll also talk about how they can be used together to take screenshots and quickly navigate from one app to the next. For more information about how I do this, check out my TpT freebie (the very first thing I ever made for TpT!).

4. Give time to explore
The first writing assignment my students will have this year will be to write an informational piece (either descriptive or how-to) about an app of their choosing. By giving them this assignment, I'm giving them time to play around with the iPad and explore the available apps while also getting a baseline writing sample. This has the added benefit of cultivating "experts" about the different apps among the students.

We actually start school on a Thursday this year, and I intend to get all of this started during those first two days.

Organizing Myself

As I prepare for my paperless year, there are a few items I'm working on before the students even arrive. This will help me be ready to go on day #1.

1. Create a stack of Evernote notebooks for all of my students.


I'm planning to keep all of my conferring notes, work samples, and other relevant data in Evernote this year. To prepare for that, I've created an Evernote notebook for each student, and I have them clustered together in a "stack" so that all of my homeroom students are together.

Since I anticipate using this system for many years, I'm formatting the notebook names as "2013 - Last name, First name." That way, I won't get confused when I'm quickly looking for the notebooks for this year's students as opposed to last year's. I've also created one additional notebook called "2013-2014 Overview." Listing both years ensures that the notebook will be on top of my stack when they're sorted alphabetically, and I'll use this notebook to keep track of notes and documents that pertain to the whole class. 

You can read more about setting up Evernote notebooks in my paperless series.

2. Create a checklist template for my class.


This will also be done in Evernote.

I like to have a checklist of my class roster available whenever I'm collecting forms or tracking important information. I'll make a blank checklist now, and then I can copy and paste it into future notes as needed. This is a huge time-saver down the road for me.

3. Make sure that my Dropbox folders are set up for distributing student work.


Although there are plenty of learning management systems available, I strongly prefer Dropbox for distributing assignments to students just because it's so easy on my end. All I had to do was create a folder titled "Student Assignments."

Once the daily folders are set up within the Student Assignments folder, I can share all of the folders through a link on my class website, and students can easily access everything they'll need for daily assignments. To read a complete step-by-step tutorial for how to do this, check out my previous post.

Since I set this up at the end of last year, all I needed to do was empty out the assignments I gave to last year's class so that I can start fresh this year.

4. Create a class on Class Dojo.


Class Dojo is an excellent online classroom management app that I'll be utilizing more this year. I'll tell you more about how I'm integrating it with my classroom economy in a future post, but for now, all I need to do is input my student roster and print out home access codes for my students and their parents. Then it will be all set to go.

5. Create a new group on Edmodo and prepare a welcome message.


(Edmodo has totally changed its app icon, btw. Check it out!)

I'll be using Edmodo to collect student assignments, give quizzes, conduct class discussions, and take polls. I'll need to have a group code ready to give students for the first day so they can sign up, and I'll want them to have something to see and do immediately when they log in for the first time.

****
Once I finish these 5 steps, I think I'll be ready to start the year. I have to admit, I find prepping for a paperless classroom far easier than what I experienced in the past. I'm looking forward to going on this journey with my students this year, and I can't wait to share all of the learning we'll have in store for us. It's going to be a fantastic school year!

Can't wait to read about how others are organizing and managing technology in their classrooms. Be sure to check out the other posts in the Tune into Technology linky, and have a great week!

Wednesday, June 5, 2013

Pinterest Professional Learning

I love Pinterest. I love professional learning. Put them together, and I'm as happy as can be! That's why I was thrilled to see that Jivey's Workshop Wednesday is all about favorite pins (and she used my Assess Yourself posters as an example)!


So without further adieu, I'd like to share some of my favorite pins!

Back to School Organizing


I'm planning to replace my table-top caddies this year because they've really taken a beating. One thing that's contributed to that is that they've been really disorganized, so kids dig through them looking for supplies. Even though they have cups in the caddy to hold supplies, the kids don't remember where to put their materials in the caddie, and it becomes a huge mess. Having labels on the outside could eliminate the guess work (and the excuses) so they can stay organized. I'll probably do something super cutesy with them, though, because Pinterest inspires that.

Teaching Writing


Before becoming a teacher, I coached a college debate team, and I was a high school and college debater before that. People often think that means that I like to argue, but that's not the case at all -- I hate arguing with people. I'm really anti-confrontation. But if I'm in an argument, you better believe that I'm going to have examples and evidence to back up what I'm saying, and chances are, I'll also know what I'm going to say to respond to your counterarguments. My husband, who has a similar debate background, often jokes that even though he was a great debater himself, he knows he'll lose any argument that I initiate with him because I'll go into battle ready. Fortunately, we hardly ever argue.

Understanding how to use evidence and reasoning and how to respond to counterarguments are important skills for advocacy, and I think they're some of the most valuable skills we can teach to students. So as the Common Core moves away from persuasive writing toward argumentative writing, I think it's really important that we emphasize the differences. I love these exemplars for demonstrating what argumentative writing looks like. And in my mind, well-written argumentative essays are far more persuasive than one-sided appeals on a topic.

Off my soap box now. 

Teaching Science


While I'm going to be almost completely paperless in my classroom next year, I still intend to use science notebooks (albeit electronic ones). I like this anchor chart for showing students some of the important characteristics of science writing.

If you haven't linked up with Ideas By Jivey's Pinterest Professional Learning, be sure to do so. And of course, I'd love for you to follow me on Pinterest as well. The vast majority of my pins are teaching-related (and the rest tend to be recipes and home organizing stuff...nothing too crazy).


Happy Pinning!

Tuesday, September 11, 2012

Bananas about Scientific Writing

One of the things that's really exciting to me about Common Core this year is how well it integrates with content teaching for Science and Social Studies. Now that I'm a working mom, I really appreciate anything that allows me to hit multiple subjects and standards at once, and last term, I found myself pushing a lot of informational writing into science.

During our first week of school, I was covering science process standards before launching into our first unit on ecosystems. One of the first activities that we did involved writing about bananas.

In the few days prior to this lesson, we spent some time looking at and talking about science notebooks and the importance of recording our thinking. We took a look at some examples of real science notebooks kept by actual scientists (Note: as I write this blog, the sciencenotebooks.org website appears to be down. I really hope this is a temporary thing because it was a tremendous resource!). For this day's lesson, I asked my students to get out their inquiry notebooks, and I gave each student a banana. They were instructed not to eat their banana, but instead, they were to observe and describe their banana in their notebook.


During this first wave of writing (3-5 minutes), students gave very similar descriptions such as "long, yellow, brown spot," etc. 

We shared descriptions at our tables, and then I asked the class how many students felt like they could identify their banana based on their description if I collected all the bananas from the tables and mixed them up. Only a couple of hands went up. We then talked about what kinds of information and details would be helpful to do that and started a list.


What really came out of this discussion was the idea that we needed to focus on unique characteristics. Everyone had a general idea what a banana looks like, but details such as having a brown spot in the shape of a heart approximately 2 inches from the end of the banana sure went a long way in helping us identify the banana in comparison to "long and yellow with brown spots."

I then gave them time to revise their descriptions. Some students traced their banana in their notebooks and then added details and markings from their banana.

Other students asked to get out tape measures to be even more precise in their details and descriptions.

At the end of this revising time, I had students mix up their bananas between two tables and trade notebooks with another student to see if the other person could identify the correct banana based on the description. It was a great check to see if the details were descriptive enough so that others beyond the writer would understand them. If the correct banana wasn't identified, the students made suggestions for additional details that could be helpful.

What I loved about this activity was how it really got us thinking about interesting details. It's the kind of anchor lesson that we can refer to in all types of writing when we talk about spicing up our writing and good word choices. The bananas were inexpensive, and of course, we ate them at the end of the lesson. 

Do you use science or inquiry notebooks in your classroom? What are some strategies you use to help your students write in science? I'd love to hear your thoughts in the comments section!

Monday, August 13, 2012

Management Monday - Class Constitution

Today, I wanted to share one of my favorite first day of school activities with you as I know many of you have either started back up or will be soon. Each year, the citizens of Eberopolis take part in drafting their own class constitution. I think that it's very important for the students to feel like they have a say in creating the norms by which our class will operate, and by the time they reach 4th grade, they have enough experience with school and its expectations to have a sense for what will work and what won't. I also find that the process of writing our class constitution helps me gauge what my class will be like. One year, for example, I had a class of students who felt that reading was so important that we needed to have 30 minutes of independent reading time written into our class constitution. (I don't need to tell you how rare and awesome that class was...I also don't think they were ALL that enthusiastic about reading, but none of them dared to be the kid who spoke up against reading on that first day of school.) Most years, I get classes who propose having 30 minutes of recess instead. Either way, I get a sense of what they enjoy and what some of their priorities are.

This year, I incorporated some ideas that I'd seen on other blogs and also tried to make it fit within some of the lingo of the IB programme we use. One of the big ideas connected with our Primary Years Programme is the action cycle -- the idea that we can choose a cause or a problem to address, act in a way that addresses the issue, and then reflect on our actions and the process. This choose-act-reflect cycle can apply to pretty much anything, and this year, it applied to our constitution writing.

On the first day of school, I asked the students to divide a piece of paper into four quadrants.

Quadrant 1: Choose and describe the kind of classroom you'd like to have. Be as detailed and specific as possible.
Quadrant 2: Choose and describe the kind of teacher you'd like to have. Try to use specific words and examples, not just vague adjectives like "nice" or "fun."
Quadrant 3: Choose and describe the kind of student you'd like to be this year. What are some of your goals?
Quadrant 4: What are some specific things that could be done to make your choices possible?

After they had a few minutes to write, we moved into the "Action" stage where they were able to share some of their suggestions for how we could achieve their ideas this year. At this stage, they were just brainstorming and sharing possibilities, so we weren't really worried about writing "rules," per se.

Here's a sample of some of their suggestions:

Once I felt like everyone had some input into the process, I had the students reflect on the list (Choose-Act-Reflect) to make sure we had everything we needed and weren't leaving out something important. Originally, I'd intended to finish writing the constitution that day, but I ran out of time, so that became a good stopping point.

On day 2, we talked about some of the reflections, and then we started brainstorming ways that we could combine some of the suggestions into our class constitution. It took a bit of word-smithing, and I was pleased to see that I have some kids who are quite good with that this year. For example, when we were stuck deciding between the words "be careful of yourself and your surroundings" and "be respectful," one student thought that the word "mindful" incorporated both concepts. It was fantastic.

In the end, we drafted a fairly simple constitution that only had 3 "rules," but I was happy with the outcome.
I wrote up the final version, and each of the students signed it. It is now displayed prominently in our classroom, and we'll add "amendments" as we need them throughout the year. I think this is a good framework to start with, though, and coupled with our classroom economy, students know what is expected and that our expectations of each other are high.

How do you establish rules and expectations in your classroom? Any tips for the constitutional process? Feel free to share in the comment section. 

Monday, August 6, 2012

Classroom Tour 2012

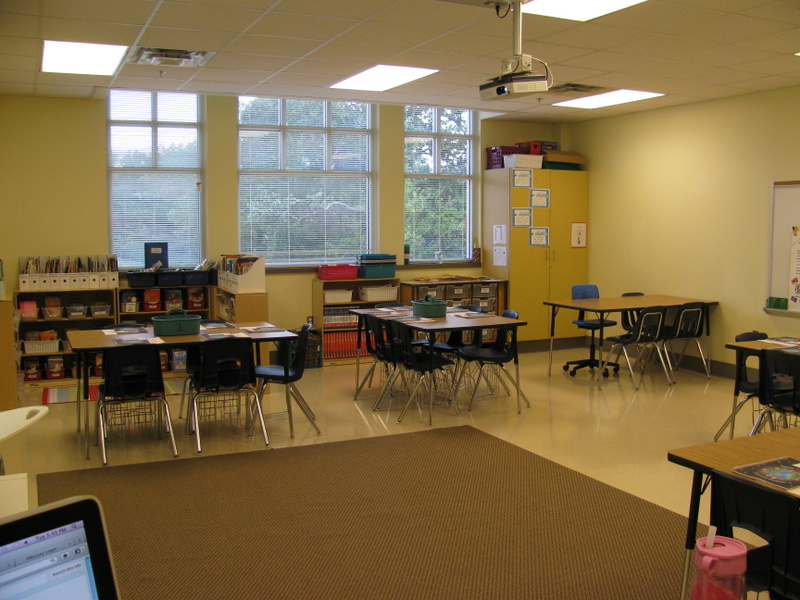
Well, I've now completed 3 days with my students, and I'm already excited about where the year is headed! I'll be sharing several tidbits in the next few days about how I've set up my classroom this year and what we did during the first few days of school, but for now, I promised I'd give a tour of my classroom. Here's how it looked moments before the parents arrived for our back to school meet and greet last Tuesday night.


I created a display of balloons with my students' names on the door outside my classroom to welcome them to Eberopolis. I ended up having 25 students to start this year, but there's always a possibility that I'll add more. 

When you walk into the classroom, this is what you would see:


I love those windows! They add so much light to my classroom. On your immediate right is my word wall. 


Last year, I didn't have a word wall, and I really missed having it to refer to. It's great to use for sponge activities and review. I've been making a lot of word wall cards to use there this year, and we've been adding  words every day since school started. 

Next is my behavior clip chart.
So far, it has been working really well. Last year, I didn't have the opportunity to have students move up and down -- there were only four colors, and they were done on cards in a pocket chart. This system allows me to focus more on the positive behaviors, and I'm integrating it with my class economy. 

Here's a better view of the entire back wall (taken from my desk area):

On my whiteboard, I have a few things hanging up or resting on the ledge.

There's my homework magnet -- a VistaPrint creation -- along with some days of the week magnets I picked up from Target.

I also have my "Missing Homework Log." Each student has a page in this, and anytime they forget an assignment, they have to write it down and write down the reason they don't have it to turn in on time. (I saw this originally on Pinterest, but now I don't know where the idea originated...if it's yours, let me know so I can give you credit!) This builds accountability and is handy for me when I have to go back at the end of the term and figure out who consistently forgets their homework so I can share that with parents in report card comments.

I had a few items that I wanted donated to the classroom, so I had this displayed at the Meet & Greet. Most of the apples were taken by the end of the night. 

Moving on to the back corner of my room...
I'll be using that back table to meet with small groups this year. By the end of the Meet & Greet, the table and the surrounding floor space was buried in school supplies that parents dropped off. 

The cabinet behind the table locks and houses my class laptops and some science materials. 
It also displays my student self-assessment posters.

Beside the cabinet is one of my two rolling tables.
For the Meet & Greet, this is where I put the sign-in sheet and handouts that needed to be sent home. Normally, however, this is where students will make their lunch choices in the morning and turn in papers.

Between the two carts (one on each side of the room), I have 24 drawers. This is a little inconvenient given that I have 25 students, so I decided to change my system this year. Rather than giving each student a drawer and relegating one to a plastic basket on the side, I decided to organize the drawers by teams and subjects.
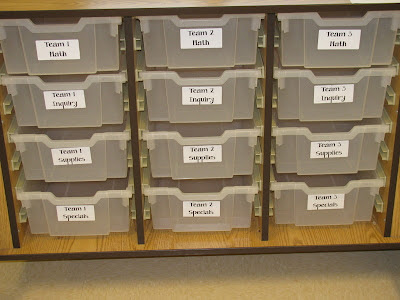
I have 5 tables/teams, and each team gets 4 drawers. The math drawer contains their math journals, any manipulatives they may need, and any math work-in-progress. The inquiry drawer is for their inquiry notebooks and any science or social studies materials they're using. The supply drawer holds general supplies like glue sticks, scissors, and colored pencils -- supplies we use frequently, but not so frequently that I'd want them out on their tables all the time. The last drawer is for specials. That's where they'll keep their music folders, Spanish notebooks, and anything else they need for Art, PE, Music, or Spanish. So far, I love this new system. It lets me pass out some materials in advance -- I can put math manipulatives for the day in each team's drawer, for example, before we get to the lesson. It also meant that I had 4 extra drawers left over which is very handy for storing all of the supplies that students brought in. 
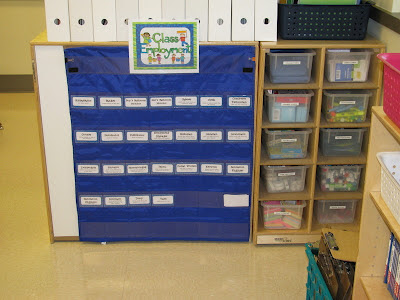
Beside the cart is a bookcase for textbooks and reference books, a bin for our clipboards, and then a supply cart and our class jobs board. The supply cart holds things such as calculators, sticky notes, highlighters, index cards, flash cards, dry erase markers, and a few other small things that I want students to be able to access as needed. For our job board, I had students apply for jobs last week, and I took a picture of each student on the first day. Once I decide on the jobs for this term, I'll put their picture in the pocket chart behind the job that they're assigned to.

Behind my job chart is my classroom library.
Last year, it was flat against the wall, but this year, I built it as a little nook inside our classroom. The bins on the top shelf hold mostly non-fiction books. The shelves below it hold books sorted into categories such as favorite authors, favorite series, and genres. Students can borrow and take home two books at a time, and they sign out their books in library checkout folder. At some point, I want to create an electronic checkout system for my classroom, but I haven't had time to work on that yet.

Looking toward the front of my classroom, you'd see this:
We have a large carpeted area for class meetings and lessons at our ActivBoard. To the right of the ActivBoard is my class schedule pocket chart, and I'll be decorating the green bulletin board for our first Unit of Inquiry. My Writer's Workshop wheel hangs underneath my ActivBoard, and then I have my calendar math board and reading/writing materials to the left of the ActivBoard.

Here's a close-up view of that:
Each student has a book bin to hold reading notebooks, writing notebooks, and any books they're reading. Last year, the bins were on the floor, and I hated it, so I decided to splurge on a shelf from Ikea. Already I am far happier.

You can also see my desk -- the neatest it will be all year, I'm sure, and my teacher resource bookshelf behind it. 

Here's what the full wall looks like from my classroom library nook:
From this angle, you can also see my filing cabinet, my second storage cabinet, my student mailboxes, and my other rolling table. I plan to decorate that side of my room more, but I just haven't gotten to that yet. There doesn't seem to be enough hours in the day!

So there you have it! A complete tour of Eberopolis as seen by my new students and their parents at the Meet & Greet last week. 

If you have any questions about something I forgot to talk about, let me know in the comments. I'm pretty happy with my classroom layout this year, so I'll be happy to share.

Until next time,

Thursday, July 19, 2012

So it starts...

All of the teachers in my district report back to school next Wednesday. Yes, you read that correctly. NEXT WEDNESDAY! While I'm unquestionably excited about meeting a new bunch of 4th graders (27 of them, in fact, if my current roster holds...), there's a certain element of panic that comes with my final week of vacation. A panic that sounds like "What have I done with my summer?" or "Where did all the time go?" or "How in the world am I going to get my monstrous to do list done in time?!?!?!"

Along with that panic came my first visit back to my classroom this week. Here's how it looked when I arrived:
View from door

View from back corner
 It wasn't so bad. The floors are so happy and shiny, and most of the furniture was reasonably close to its original location. There were a couple of casualties, however. A bookshelf broke, and a large section of my classroom library was dumped into the blue recycling bin.

With a couple of hours of work and brainstorming and a little assistance from my friend down the hall, I was able to get it closer to the arrangement I'm planning to try this year.
View from door
The way that it's currently set up, I have 5 tables arranged for students to sit at and the sixth table is at the back corner to be used for small group work. With 27 students, however, that would mean having 5-6 kids assigned to each table, and I'm not sure how well that will work. I'm lobbying to get an additional table (where I'd put it is an entirely separate question...), but I'm not sure my lobbying efforts will be successful. I'll have to think more about this.

View from back corner
From this angle, you can see our class carpet/meeting space and my desk/work area. Since everything is still packed up, it looks so delightfully clutter-free. You can be certain that won't last...

Also from back corner
I'm trying something new this year in that I'm having a book case come out from the wall to make my classroom library more of a U-shape. I'm planning to cover the back of that bookcase with something, although I haven't entirely decided what yet. Probably something related to my class library book checkout or some other chart.

View from inside the classroom library space
My classroom looks a lot bigger than it feels from this angle...

View from my desk
I really love having those windows in my classroom, although our view won't be so great this year. They're going to be building a new wing onto our school, so my classroom will overlook a construction site. I'm sure that will be lovely and not at all distracting. Sigh...

So that's the bare-bones tour of my classroom space. My next back to school project will be to unpack and organize my classroom library. If you have any great suggestions or tips related to that, I'd love to hear them in the comment section!

Related Posts Plugin for WordPress, Blogger...