Sunday, May 5, 2013

Currently May & Life Updates (aka Why I've been a Bad Blogger)

How could it possibly be May 5th already? And how could I have possibly neglected my blog for a week shy of a month??? Yikes! Things have been super busy in Eberopolis lately, and to start that big update and get back in the swing of things, I'm like the 400th person to link up with Farley's Currently over at Oh' Boy 4th Grade.


Listening: It has been raining the past two weekends. The weather has been great on the weekdays, but it's practically monsoon season once Saturday arrives. Given that I'm trying to start a vegetable garden, the rain is a bit inconvenient. Today I finally gave up on waiting, put on some rain boots, and went and gardened in the mud. My raised plant beds are now all set up, and I'm anxious to see how successful I'll be with my first garden. Thank you, Pinterest, for inspiring yet another project that I may or may not have time for! :)
Loving: Wrapping up the end of the school year is always so hard, especially once we hit this stretch after standardized tests when the weather is fantastic and the schedule is constantly interrupted with end of year events. I'm loving that the end is finally in sight with only three more weeks to go! (My students are done on the Friday before Memorial Day; I have two post-planning days the following week.)
Thinking: This year has just whirred by me! I've absolutely loved this group of students, and we've accomplished so much this year. It's hard to believe that we're in that final stretch.
Wanting: My classroom is, for lack of a better description, a bit of a mess. I've stashed all sorts of things in cupboards and storage units, and I really need to declutter. I want it all to be very well organized and accessible when I return in July. (Yes, July...the flip-side of finishing before Memorial Day is that the students will report on August 1, which means teachers report in late July...) The fact that I'm moving toward a paperless set up is helping, but there's still a lot to organize.
Needing: My summer wardrobe is so blah, and I've gained a few pounds this year, which makes my need to go shopping more necessary and less appealing. If I can just get through these next few weeks, I think I'll be able to go through my closet and get a better handle on things.
Summer Bucket List: I need to finish making my transition to going paperless, which means I'll need to consolidate and reorganize some files and break out the scanner for some of my paper files. I can tell already that this is going to be worth it in the end. I've emptied out an entire filing cabinet in my classroom already, and that alone has created a ton of possible storage space that I never had before. It's glorious.

I have several blog posts in the works for the next few days -- I think my blog hiatus is over, but I did want to share a bit about what's been going on that's left me MIA lately.
1. We became a 1:1 iPad school. April 15th was the day that all of the 4th and 5th graders in my school received iPads, and it's been very exciting. I've changed up a lot of how I do things to accommodate the full-time access to iPads, and I'm really happy with the results. It has also meant that I've spent a lot of my time troubleshooting and exploring possibilities and coaching my colleagues as they try out the iPads with their students for the first time.
2. I got accepted into a doctoral program! Starting this fall, I'll be working on my EdD at University of Georgia in Educational Leadership. I don't particularly want to be a principal or anything like that, but I would like to do more in curriculum leadership and teacher professional development, so this is the next step. I'm really excited about the program, but I'm a bit terrified over the time commitment -- especially with a toddler and all that I'm already doing at work. If I don't do it now, though, I probably won't get around to it until the little one gets MUCH older, so here we go!
3. We did standardized testing. Is there anything more boring and unnecessarily stressful than administering those tests?! I know my students were well-prepared, and yet, I have nightmares about those $*(@ tests every year. They really wiped me out this year for some reason.
4. Lots of long term projects got wrapped up. Between writing committee reports and finishing assignments for my math endorsement, I've had very little free time. In fact, I'm already three episodes behind in this season of Mad Men, and usually very little can stand between me and Don Draper! Things seem to be calming down a bit, so I'm hopeful that I'll be able to get back into a good routine and back to blogging more regularly. I've missed the blogosphere a bunch, and I have so many blogs I need to visit and catch up on!

So that's where May finds me. I hope all of you are doing well, and happy Teacher Appreciation Week! (I WILL be participating in the TpT sale, btw!)

Have a great week!

Friday, April 12, 2013

Guided Math Resources

I recently went to a workshop about guided math groups, and I have tons of new ideas that I'll be sharing in the coming weeks. I couldn't wait, however, to share a couple of the resources that I'm really excited about.

First, is this book:

Good Questions: Great Ways to Differentiate Mathematics Instruction, Second Edition  is a resource that I was able to start using with my students as soon as I got it. It is full of open-ended questions and parallel tasks that students at any level could access. It's organized both by grade levels (K-2, 3-5, 6-8) and domain strands (Number and Operations, Geometry, Measurement, Algebra, and Data Analysis and Probability). It also lists which Common Core State Standards each question aligns to.

We were working on line plots (4.MD.4) when the book first arrived. Consider these problems:
You create a line plot that is based on measuring items to the nearest quarter of an inch. You notice that your plot looks a lot like a steep mountain. What might the measurements be and what might you be measuring? Why does it make sense that your plot would look like a steep mountain? (p. 174)
We had a great class discussion about inferences we can make about data based on the shape of a line plot, and students were really creative about what the line plot could be measuring.

There was also a parallel task where students could choose how to represent the data.
The set of data below describes the ages of a group of people at a family party.
32, 30, 5, 2, 1, 62, 58, 28, 26, 25, 24, 2, 4, 39, 16. 
Choice 1: Create a line plot to display the data. 
Choice 2: Create a bar graph to display the data. (p. 186)
Some students felt more comfortable with bar graphs, but they realized that it was harder to figure out intervals and scales for the bar graph vs. a line plot. That yielded a great discussion about how to choose which type of graph to use.

This is a great resource to use for student math journals, and it's one that I will be going to daily. I can't recommend this resource enough.

Another math resource that I'm falling in love with for my math workshop and guided math groups comes from the Bridges in Mathematics program. Until attending the workshop, I'd never even heard of this program, but it seems like it's well-suited for developing math centers and guided math groups. There are some sample tasks available as a free supplement to the the program (to align it with Common Core) at http://catalog.mathlearningcenter.org/free. I'm also planning to purchase their Building Computational Fluency program for $45. I need something more structured and organized for checking students' multiplication and division fluency in the fall.

Do any of you use the Bridges in Mathematics program in your school? If so, I'd love to hear more about it -- I'm really intrigued!

Have a great weekend!

Monday, April 8, 2013

Paperless Mission #7: Annotating Rubrics with GoodReader (iPad)

This is the seventh post in my Go Paperless! Challenge Series. If you haven't completed the previous missions, be sure to complete those first.

Also be sure to link up at the Go Paperless! Linky.


Mission #7: Annotating Rubrics with GoodReader (iPad)

I try to give my students high-quality feedback whenever possible, especially on their writing assignments. In the past, it would take me days to grade all of their papers and write hand-write comments on their rubrics. So when I passed those papers and rubrics back to students, it would kill me to see students stuff them into the abyss of their backpacks, or worse -- toss them into the recycling bin. I wanted them to take it home and share it with their parents, and I wanted them to be able to refer back to that feedback. Eventually I learned to photocopy the rubrics before I passed them back, but that still wasn't ideal. It created more paper clutter and one more thing for me to work on organizing.

When I say that GoodReader has become one of my all-time favorite apps, I mean it. I now use GoodReader to fill out rubrics and other student feedback. To start, make sure that you have the rubric saved as .pdf in Dropbox. While GoodReader can read any type of document, it will only annotate a .pdf. Then open up the .pdf of the rubric in GoodReader (see previous tutorial).


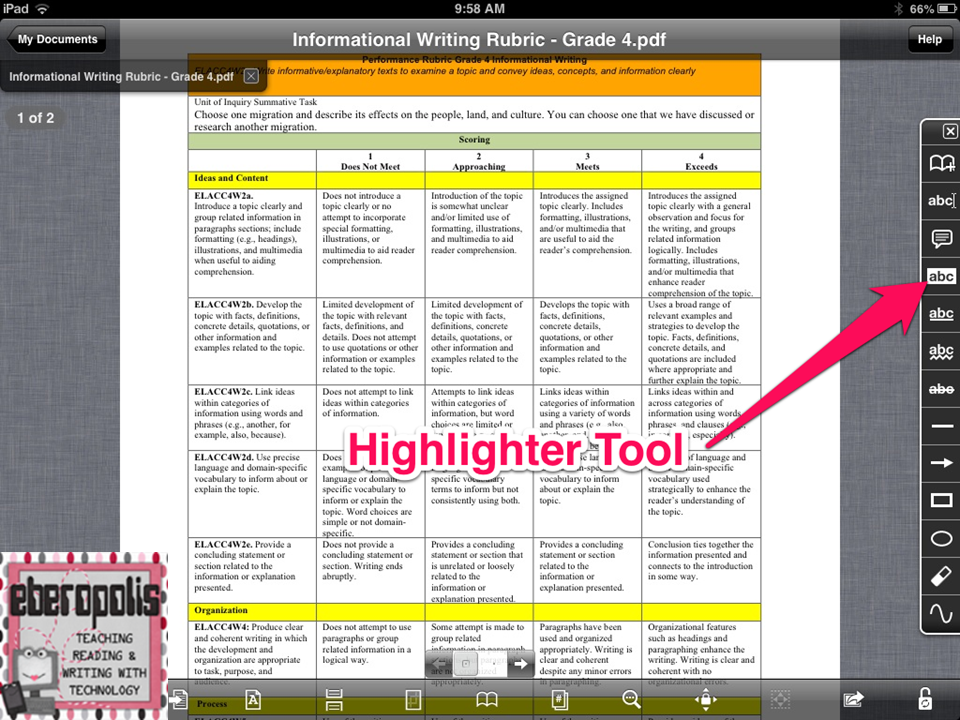
Choose the highlighter tool to highlight the appropriate categories on the rubric. The first time that you go to annotate a document, it will ask you if you want to save to this file or create an annotated copy. If it's a document that I'm only planning to use once or student work, I typically select "Save to this file." When I'm planning to use the document over and over again, though, I'll create an annotated copy. That's what I'd choose when using a rubric to grade student work.


Once I've made my selection, I'll be able to annotate all over the document. Once you're in the highlighter tool, you can drag your finger over the text that you want to highlight. You can change the color of your highlighter, and you can also delete highlights by tapping on the highlighted area.

At the end of the rubric, I like to type specific comments for my students. To do that, choose the typewriter tool. A little window will pop up for you to type your comments, and then it will save them to the document. If it saves it in the wrong spot, simply tap on the text and a new menu of options will appear.

You can drag and drop the text into the correct space and re-size the text area to get it formatted the way you'd like.


 When you're done annotating the rubric, tap the center of your screen to see the "My Documents" option.

From there, you'll want to rename your file. To do this, select "Manage Files," then tap on the annotated copy of your rubric and select "rename."

Once you've renamed your document, you'll have some options for moving it. First, I send a copy to the student's notebook in Evernote. To do this, tap "Manage Files" again, select your newly renamed document, and select "Open In." A new window will pop up asking how you'll want to save the file. Select "Flatten annotations" because that will preserve your edits and merge it into the document so that you don't lose your work.

Once you've chosen that, another window will open showing which of your installed programs you can open it in. As you can see, I've get several options available. You could also upload it directly to Dropbox if you would like to back up your work there rather than in your student notebook. This might be a good option if you have a folder shared with the student for passing back work.
When I'm ready to hand back the rubric to students, I open it in Edmodo and attach it as a direct message to the individual student. This allows the student and his or her parents to see it. They could also download a copy if they're using a computer. (I've had mixed results with document downloads through Edmodo on the iPad.)

This system has been incredibly helpful for me. It's easy to manage because I don't have to keep track of paper or make sure that I've made enough copies of the grading rubric before I start grading. Just one more step in the quest to curb paper clutter.

What are some other ways you can imagine using GoodReader in the classroom? I'd love to hear your ideas in the comments section!

Monday, April 1, 2013

Paperless Mission #6: Setting Up GoodReader (iPad)

This is the sixth post in my Go Paperless! Challenge Series. If you haven't completed the previous missions, be sure to complete those first.
Also be sure to link up at the Go Paperless! Linky. 


Mission #6: Setting Up GoodReader (iPad)

As I've mentioned before, I work off a lot of devices. I'm in a 1:1 iPad classroom, but even before my students had access, I had an iPad of my own that I used constantly. I liked having it handy for anything that I was working on, and once I learned about GoodReader, my love for the iPad grew tremendously. I've shared some love for GoodReader before, but GoodReader is the ultimate document reader for the iPad. It allows you to read any type of document and annotate over .pdf files. It also syncs with a variety of other apps, allowing you to pull and read all of your important documents into one place.

Once you have your important documents organized on Dropbox, open up the GoodReader app on your iPad. Here, you'll be able to connect GoodReader to your Dropbox account. To do this,


My documents list already has some items and folders listed, but yours will likely be empty. The left column shows all of the folders and documents you have saved in GoodReader (and could therefore access without an internet connection). The right column has all of the utilities for GoodReader. Today, we're going to focus on the one towards the bottom -- "Connect to Servers." 

When you click on the "Add" button, you'll be able to see the many, many connections GoodReader can make. Here are a few highlights:
  • Popular Mail Servers (GMail, Hotmail, etc.) - this connection doesn't grab all of your emails, but it will allow you to see any messages that have an attachment. This is great for when you're at a meeting and somebody sends out some documents you need.
  • Dropbox - you can read all of the files that you've saved there.
  • Google Drive - view any type of Google Drive file that you have -- from spreadsheets to presentations to documents.
The connection set-ups are fairly intuitive. You will need to name each set up (On some screens that shows up as "Readable Title;" I named mine based on what I was connecting to), but then you simply enter your username. You can also enter your password, in which case it will be saved to the device and you won't have to enter it again, or you can log-in each time you want to access a document.

As you can see from my left column, there are a few folders that I've downloaded straight to GoodReader so they'll always be available to me. These are folders that I'm constantly using and want easy access to. I also have it set up so that they'll automatically download updates to those folders whenever I add more documents to my Dropbox account. 

Once the folders are set up in GoodReader, you can read the documents, but you can also annotate over .pdf files. I use that feature a lot on my curriculum documents, and I've also started doing all of my running records and reading assessments on my iPad. Here's an example that shows you the annotation tools in the document viewing pane:


I keep my annotating toolbar pinned on the right side, and there you can see a variety of annotation options that are available -- typewriting text, creating "sticky notes," highlighting, underlining, drawing boxes, arrows, etc., and the last option is the freehand tool. I use this for running records with a stylus.

One of the best things about GoodReader is that it works well with other apps. Once I finish annotating a document, I can send it to other apps such as Evernote or Dropbox  from the original "My Documents" screen.


How I Use It

This is one of my must-have apps because of the broad range of ways it can be used:

  • Turn your iPad into a second computer monitor -- When I'm using lots of curriculum documents to write unit plans, I can leave it open in GoodReader with all of my notes and highlights while I work on my laptop or computer. No more switching between screens on my computer. (Am I the only one who finds that annoying sometimes???)
  • Highlight standards that you're focusing on each term without having to print out (or lose) new documents all the time.
  • Annotate rubrics, running records, and other types of student work
  • Use with students to create paperless assignments

I'll be posting more in-depth tutorials about how to do all of these in future installations of this series, but for now, your challenge is to begin exploring GoodReader. Then, in the comment section, share a bit about how you think this app could be useful.

Spring break starts next week for me, and I can't wait! I will try to get another installment posted this week, but I make no promises. It's the end of the term, and that's always a super-busy time with report cards and grading. I must say, however, that I'm more organized than ever going into this given how much less paper I'm using!

Have a great week!

Sunday, March 24, 2013

Paperless Mission #5: Organize Your Files in DropBox

This is the fifth post in my Go Paperless! Challenge Series. If you haven't completed the previous missions, be sure to complete those first.
Also be sure to link up at the Go Paperless! linky.


Mission #5: Organize Your Files in DropBox

I routinely work off of multiple computers and devices. I have a desktop computer in my classroom, a work laptop, a work iPad, a home desktop, a personal iPad, and an iPhone, and from time to time, I'll use someone else's computer for something. Few things have frustrated me more than being on a computer and realizing that the file that I worked on was saved to another device and therefore unavailable. Flash drives got me by for a little while, but then there were always issues about remembering to save it to my computer and my flash drive, and if I changed something on one device, I'd need to remember to update the files on other devices. There was always a bit of paranoia, too, about whether the drive would get corrupted and everything on it lost. It just wasn't a good system for me.

Enter DropBox. I started using this platform a few years ago, and it has revolutionized how I manage my files. DropBox is an online file hosting platform. A basic (free) account gives you 2GB of storage with opportunities to earn up to 16 GB through referrals and social networking. There is also a paid version that gives you 100 GB for $9.99/month or $99/year. There are 200 GB and 500 GB paid versions as well, but that's far beyond my needs. I haven't even upgraded to a paid account yet!
Once you sign up for an account, you can download a version of DropBox to your computer that will automatically sync any files you save to it to your DropBox account online. From there, you can access your files from any computer or device with DropBox installed (there's an app version) or from any internet connection by signing in at www.dropbox.com.

How I Use It

Over the last few years, I've moved almost all of my documents over to DropBox. Here are some examples of the types of things I keep there:
  • Curriculum documents - standards, pacing guides, state frameworks, etc
  • e-Books/supporting documents for textbook series
  • TpT creations and purchases
  • Assessments and activities
  • Clip Art Collections
  • Guided Reading resources
  • Photos
  • Desk Drawer folder - for all of the electronic stuff I would otherwise file in my desk
  • Much, much more!

I like having my stuff there for a variety of reasons:
1. Accessibility - no more worrying if something is on another computer or if I have the flash drive.
2. Back-up - since it's all stored in the cloud, I don't live in fear of a major computer meltdown. If my computer goes on the fritz, I'll still be able to get all of my stuff.
3. Constant syncing - If I'm working on a project on my laptop at school (which has DropBox installed), I can come home and switch to my desktop which also has DropBox. DropBox notices when you alter a document, and it will automatically sync those changes to your files across all of the devices as long as you have an internet connection. 

Evenote vs. DropBox

Evernote and DropBox obviously figure heavily in my paperless scheme, and it's definitely the case that there's some overlap between their features. I could, for example, save documents and attachments in Evernote Notebooks. But I think of Evernote as the replacement for my data and curriculum binders -- the place where I can put documents that I'm likely to need constantly and an archive of assessments. It's also a place for work that I'm annotating and evaluating. DropBox is more like my filing cabinet for all of the great activities I might need from time to time. I might pull something out and work on it, but it's more for storage.

Your Assignment

Make sure that you have a DropBox account. (If you haven't already signed up for DropBox, please use my referral link. We'll both get 500 MB of extra space!) Download the DropBox client on the computer(s) you use most, and begin to backup your files to DropBox. Empty out those flash drives and folders you have so you can get all of your work in one spot. Think of how you'll want to name your folders -- especially if you're consolidating documents from a variety of places. But getting your DropBox set up and ready to go will be a necessary step before your next mission on using GoodReader.

How's your move toward paperless going? I'd love to hear your updates in the comment section!

Thursday, March 14, 2013

Paperless Mission #4: Create Checklists in Evernote

If you haven't already completed the prior missions, be sure to complete those first.
Also be sure to link up at the Go Paperless! Challenge linky.


Mission #4: Create Checklists in Evernote

I use checklists for everything -- keeping track of who has turned in assignments, what standards I need to teach during the term, etc., and those checklists are great at keeping me organized. But that organizational process breaks down when I start accumulating too many paper checklists. Either I can't find where I put the particular one I'm looking for, or I have to search through so many to figure out the data I'm looking for. It's a mess! But yet again, Evernote is saving the day for me with its checklist features!

In order to make an organized table checklist, you'll need to use the downloaded Desktop version of the Evernote platform. At this time, only the downloaded desktop platform seems to have the Table feature. My images show what it will look like on a Mac version; the PC version might be slightly different.

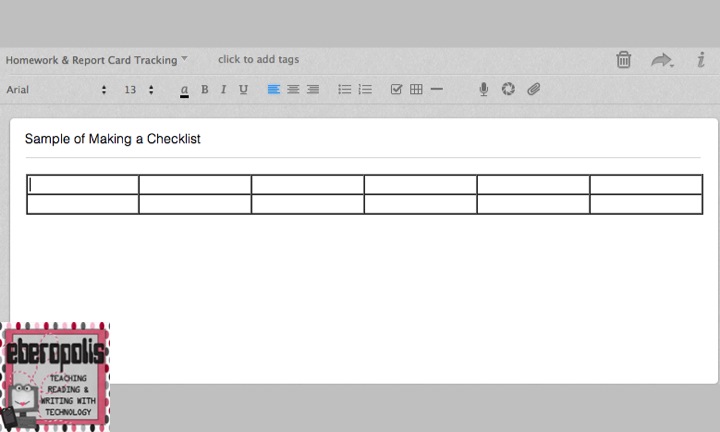
To make a checklist, create a new note. Then choose the "Table" tool.


You'll have an option about how many rows and columns you want to insert. I recommend limiting yourself to 2 rows -- one as your header and one for the checklist. I think it looks better, and it's a little easier to edit and work with later on.


Once you're ready to insert your student's names, choose the "Insert to-do" button (the checkbox) into the second row of your table and begin typing. (Leave the first line for your header). Every time you hit "return/enter," it will automatically insert a new checkbox.


After you've typed your list once, just copy and paste it into the other columns. It will automatically adjust the width to balance the columns


I use this blank list as a template for each time I want to create a new checklist. You have to manually copy and paste the table into a new note -- there's no duplicate note function that I've found on any of the platforms -- but it's still a pretty seamless process. And once I've created the initial checklist through the Desktop version, I can use the checklisted table on any platform (web, iPad, etc.). I can check off boxes and add in text, but I can't add new columns on the non-desktop versions.

You can also create checklists on the web and iPad versions, but without the help of a table, it's much harder to have a multi-column checklist that's easy to read. The multiple columns are really useful for me with tracking information across a grading period. The single column is perfect for things like my to-do list, however.

How I Use This...

I've made a separate "Homework and Report Card Tracking" Notebook on Evernote where I keep all of these checklists. I use this notebook to look at data that I need for my class as a whole -- not just individual students. This is also where I'm starting to keep reports about guided reading levels and other whole class data.

Now, when I need to keep track of assignments that are turned in, forms I've collected, or any other material I'd track, I can just carry around my iPad and check-off the student's name. Tagging each note thoroughly means that I can always easily find the data I'm looking for, so it's been an organizational blessing!

Your Assignment:

Create a tabled checklist with your students' names. Play around with the table and checklist tools and think about how you could use this to streamline your paper use. Have some ideas? Please share them in the comment section. I'd love to hear how you're using this feature because this was a recent discovery for me!

In the next post in this series, we'll start to talk about incorporating DropBox into the mix. 

Saturday, March 9, 2013

Paperless Mission #3: Email Notes to Evernote

If you haven't already completed the prior missions, be sure to do those first.

Also be sure to link up at the Go Paperless! Challenge linky!


Mission #3: Email Notes to Evernote

Now that we have our notebooks built in Evernote, we need to start putting things in them. One of the best ways to do that is through email. Did you know that your Evernote account has its own email address?! 

Step 1: Find your Evernote email address.
Here's how to find it through the web platform:


In the upper right of your screen will be your username with a down arrow next to it. Click on it, and choose "Settings." This will open up your account summary.


There you'll find an email address that will have a format of your-user-name.numbers-letters@m.evernote.com.

Step 2: Add this email address to your contacts on all of your email accounts and mobile devices.
I just named my contact "Evernote" and copied and pasted it in. Make sure that you add this contact to your school email as well your personal accounts and phone. Now that I have it set up, I find that I'm using it everywhere!

Step 3: Send emails to your account.
Once you have the address, sending emails is super easy.

  • Type your subject first. That will be the title of the note.
  • Use the "@" symbol to put the note in a specific notebook. (Without the "@" symbol, it will just go to your default notebook.)
  • Use the "#" symbol to create tags.
So for example, if I send a note that says "Informational Writing Lesson @Writer's Workshop #4W2 #lesson plans #mentor texts" it will create a note titled "Informational Writing Lesson" in my Writer's Workshop notebook with the tags "4W2," "lesson plans," and "mentor texts." It's important to write the subject in the order "note title @notebook name #tag1 #tag2" in order to get your note in the right spot.

One thing to note is that this format only works for existing notebooks and tags. It won't create new tags or notebooks at this time. Still, if the tag doesn't yet exist, the hash-tagged part will just show up at the end of your note title so you can add it to your tags later on.

If you want to add the email content to an existing note, use the format above with a "+" symbol at the end. Evernote will add it into the most recent note with the title of your subject. 

Ways this is helpful

1. Parent contacts - I'm supposed to keep a record of all of the emails that I exchange with parents, and given that my school email archives all messages after 3 months (and therefore makes it more difficult for me to access), I don't always keep up. In the past, keeping the emails meant printing each one to a .pdf file and saving it on my computer -- a tedious process that is easy to deprioritize. Now, I can just forward each email  to the appropriate student's notebook, add the tags #parent contact #email and I'm done. Easy-peasy!

2. Attachments - If you forward an email with an attachment, the attachment will be sent, too. This is helpful when my instructional coach sends me curriculum documents, rubrics, etc. 

3. Blogging - I have a blogging notebook, and I frequently have ideas or snap pictures on my iPhone or iPad for future posts. Now I can easily find those in my Evernote notebook wherever I'm at -- no more having to track down the device with the right picture or the scrap(s) of paper I wrote the idea on.

What are some other ways you can imagine emailing notes to yourself? I'd love to hear your ideas in the comment section! And if you haven't already joined the Go Paperless! Challenge, what are you waiting for?

Have a great weekend!

Related Posts Plugin for WordPress, Blogger...