Showing posts with label apps. Show all posts

Monday, July 20, 2015

Getting Started with a Flipped Classroom

Last week, I shared a bit about why I flipped my classroom, and I got some great questions! Today I want to share a bit more about my process and the logistics for flipping. There are lots of ways to do it, and I'm sure there are many other great ideas out there, but this is what has worked for me so far.


1. Plan your lessons 

a) Does it make sense to flip?
You don't want to flip for the sake of flipping. I always ask myself, "Would this lesson make sense as a flipped lesson?" There are times when some introductory lessons require lots of hands-on scaffolding, and my answer might be "no." But other times, when the lesson is mostly information and practice, the flipped model absolutely makes sense.

b) What content must be covered?
I go through my math lesson plan, and determine the content that has to be covered in the video. I'm really selective about this because I want my video to be less than 10 minutes long. It's still a mini-lesson, after all, and if I go any longer than that, my students will tune out. Plus, even though the video may be 10 minutes, the viewing time could be much longer than that if students are pausing the video to write things down or take notes. I try to keep in mind the idea that less is more.

c) Am I the best person to deliver the content?
Usually my answer is "yes," but not always. I've tried to share videos from Khan Academy or LearnZillion in the flipped model, and the kids just didn't respond as well to those. They're more likely to tune in when the video is made by their teacher because they have a personal connection. There were a few times when I've used someone else's videos because the production was significantly better in some regard (e.g., it included songs or humor that I couldn't pull off). But usually, I make the videos myself.

2. Choose your tools

Once I know the content of my lesson, I decide what method I'll use to produce the video. I choose from a few different options.

a) Screencasts
Sometimes I have a presentation already created in a flipchart for my ActivBoard, and I can just film my voice interacting with my computer screen on that. My favorite tool for screencasting is Screencast-o-matic. It's very user-friendly and it uses a yellow circle to highlight your mouse so students know where to focus their attention. The free version works well, but for $15/year, you can get lots more editing and uploading options. If you're interested in screencasting, I would recommend trying out the free version for a while to see if it's something you'd like.

b) Whiteboard apps
Usually I use whiteboard apps such as Explain Everything or Educreations to make my flipped lessons. I always create the slides in advance so that I don't waste precious recording time writing out problems or building models that could simply be explained. Then once all of the slides are in place, I'll record the audio over them. This approach also allows me to work in pieces, too, because I never know when I'm going to get interrupted.

c) Paper slide shows
I've blogged about paper slide shows before here. Sometimes the lessons are a bit more hands-on (e.g., using a protractor), and I want to show students some examples. In those instances, I use my DEWEY Document Camera Stand ($120, www.copernicused.com) that turns my iPad into a document camera, and I work and film underneath it. I mostly use this approach with Geometry and Measurement standards, but when I need to do a lot of physical manipulations, the paper slide show works well.

3. Choose your platform

Once I've made the video, I need to upload it to a platform for students to view. YouTube is blocked for students at my school, so I use Vimeo instead. I ended up buying a Vimeo Plus subscription last year ($59.95/year or $9.95/month). That gave me much more space for uploads each week (5 GB vs. 500 MB with the free version), and it sped up my upload times, so it was worth it to me when I was crunched to get the videos uploaded after school. I created a channel for some of my videos, and now I'm going back to re-make some or better tag/organize the videos for each unit.

4. Share your content

Once the videos are uploaded on Vimeo, I needed a way to share the links to the videos. When I started, I was posting the links after school each day, but I eventually cut out that step. Now I make one Google Document each term with all of the dates and lesson topics, and then I just copy and paste the links into that document as they're done. That helps my students because they find the video links in one spot, and I can post the links as they're available. Here's an example of what that document looked like one term.

Bonus Tips

1. Make your videos in batches. 
I found it much easier to make all of my videos for the week at once. I could usually tackle this in a couple of hours each week, and it was much less stressful than trying to film every day. I was able to find my rhythm with the process when I batch-produced videos, so that's how I try to work now. 

2. Start small.
Even if you only make one video each week, you're still starting to build a library of flipped lessons for future use. I didn't make as many videos as I'd wanted to last year, but I'm grateful for the ones I already have done because that's less work I'll have to do this year.

3. Divide and conquer.
See if someone else on your grade level team would be interested in flipping with you, and then divide up the lessons. Even if you're not the one teaching the lesson in every video, the students will appreciate it being someone they know. 

4. Get some cheap .mp3 players for student check-out.
Most of my students had Internet access at home to watch the videos, but a couple didn't. I wrote a grant to buy 10 inexpensive .mp3 players that students could check out to watch the videos. They didn't require an Internet connection because I saved the videos straight to the hard drives, and since they were cheap .mp3 players (<$20 each), they didn't have any bells and whistles to make them targets for theft. It was a workable solution for those students who lacked technology access at home. 

Next week, I'll share more about what my math block looks like under the flipped model. Until then, I'd love to hear from you. What are some tools you use for video production in your class? What challenges do you foresee with a flipped model? Share your thoughts in the comments section.

Monday, June 9, 2014

10 Must-Have Tools for the Busy Teacher

This year was uniquely challenging for me. I had my biggest class ever (28 students) , and I was co-teaching all day with teachers and paras from the special ed department--also a first. Meanwhile, I started working on my PhD, and my toddler constantly kept me busy. My plate has never been so full!

If you're a teacher who often feels pulled in every direction, then this list is for you. These are my top 10 tools for juggling it all. Hopefully you'll find some to use as well!


1. Nozbe


Nozbe is the ultimate task list manager. You can organize by projects -- school, work, home, etc., create recurring tasks, and so much more. I can access it from any device, add attachments, and email stuff to my to-do list. I started out with the free version, and I quickly upgraded to the paid version. At $96/year, the paid version has a hefty price tag, but this app was SO much better than any other task manager I'd tried, and it's been worth every penny. If you're someone who has lots of projects going at once, this app is worth exploring.


2. Evernote


This is my brain online. All of my coursework and notes are in Evernote, and all of my anecdotal records and student work samples are in here as well. I was able to use the free version for many years, and then once my husband and I decided to go digital with all of our financial documents, etc., I upgraded to the premium version. At $35/year, it's pretty affordable.


3. Dropbox


 I don't think I could function without Dropbox. I switch between so many devices between work, home, and school each day, but Dropbox allows me to keep track of everything. All of my lesson plans, TpT purchases, readings for class, and more are in my Dropbox account. I'm still living off of the free space, but I'm getting the daily reminders that my Dropbox is nearly full. Might need to upgrade that soon, too. Premium accounts offer 100 GB of storage for $99/year.

4. GoodReader


 I've used this app a lot with my students, but I'm finding it to be totally clutch for my grad school stuff, too. I'm doing tons of research for my courses and scoping out dissertation ideas, and GoodReader allows me to annotate all of the PDF's I'm amassing. I've created a folder on Dropbox for all of the articles I've gathered, and I can sync that folder to GoodReader so I can read it all on my iPad. I can also send it back to Evernote when I finish. One of my dear friends told me that I'd have laundry baskets full of research cluttering my house while I worked on my PhD, but not so...It's all electronic!


5. GoogleCalendar

I have a variety of calendars on Google -- class schedules, deadlines, school events, etc. Some of these I share with my husband so we can both be aware of each other's events. Other calendars I share with my students and their parents so they can be aware of upcoming events and tests. I like that all of my calendars are color-coded so I know which calendar I'm looking at, and I can select/de-select different calendars to narrow my focus if I'm looking for something in particular.


6. YouCanBook.Me

This free site allows me to share portions of my calendar with parents so they can schedule parent-teacher conferences. I choose the days they can see, set the times they can schedule, and manage the maximum time blocks they can reserve. They don't get to see any of the events on my calendar, just whether I'm available or not. If they reserve a time slot, it will automatically add it to my calendar and send me an email. It's eliminated the back-and-forth process of conference scheduling and allowed me to manage my time better.


7. Planbook.com

Since I was co-teaching this year, I needed to find a way to share my plans easily from week to week. I tested out Planbook in August, and I loved it. I like that you can extend or bump lessons, attach files, and customize the fields that appear. It's a great resource that's keeping me much more organized. You can get a free trial of it before paying the $12 for an annual subscription.

8. Typinator

This is a tool that's new to me, but Typinator is a text expander tool. There are several pieces of text that I find myself typing or copying/pasting over and over. Typinator allows me to create typing shortcuts for all of those. For example, if I want to type my blog address as a hyperlink when I comment on someone's blog, I can simply type "~bl" and it will place the text there for me. I also use it for standard replies to emails such as when parents email me to say their child will be absent. I can type "~abs" and it will write: "Thanks for letting me know about the absence. I hope your child is feeling better soon! Today's assignments will be posted on our class website, and let me know if there's anything else you need." Four key strokes = all of that. I find typing way faster than using the mouse, so this is a time saver that quickly adds up. It's only available for Macs, and it's priced in Euros (converts to around $36 US), but I use it all the time.

9. GoodReads


Distinct from GoodReader, GoodReads is an online community surrounding books. It allows me to keep track of the books I'm reading and which books I want to read next. As I'm starting my dissertation research, I'm constantly finding book titles that I want to check out. Similarly, there are lots of teaching books and children's books that I want to investigate someday, and GoodReads helps me organize all of that. Best of all, I can use its scanning feature to scan barcodes when I'm browsing in the bookstore.

10. Edmodo

I used Edmodo a lot for collecting student work and grading tests/quizzes this year. It managed all of the submissions and kept the work organized for me so I could be more efficient with tracking these things. It also allowed me to create assignments, give and grade quizzes, communicate with students and parents, and so much more. This is a great free learning management system that was a centerpiece of my classroom this year.


With the exception of Typinator, which is only on my computers, all of these apps are cloud-based or mobile-friendly so I can get to them from any device. When I'm shifting between my iPhone, iPad, laptop, and desktop, that's critical. I may be busy, but I can get to my projects anytime, anywhere, and I'm not hauling around tons of materials everywhere I go. These tools boost efficiency and minimize life clutter.

What are some tools you're using this year to help with productivity? I'd love to hear more recommendations in the comments.


This post contained some affiliate links meaning that if you click on the link and purchase the app, a small part of your subscription cost will go to me instead of entirely to the company. I'm only recommending products that I highly use and pay for myself, however, and I hope you'll find value in these resources as well. 

Thursday, July 4, 2013

5 Ways to Use iPads in Math

Today I'm linking up with the Tune into Technology Linky to share some ways to integrate technology in Math. Since I teach in a 1:1 iPad fourth grade classroom, I'll focus on how we use iPads in Math.


1. Build a Math Notebook in Evernote


Evernote is my all-time favorite note-taking app, and that extends to math as well. In addition to typing text notes, students can attach documents (handouts, activities, etc) that they've viewed on their iPads and they can also take pictures through the app or attach pictures from the camera roll. That's helpful when they build models with manipulatives and want to archive their work.

2. Reinforce concepts or conduct inquiry research with math movies.


BrainPop

Khan Academy


Two of my favorite apps to use in math are BrainPop and Khan Academy. I often use these to introduce a lesson or to differentiate instruction. I often feel like I get stretched pretty thin during math instruction because I have such a range of skills in my classroom, but these apps help. If I'm working with a student and a second student needs help, I can direct that student to a video on Khan Academy and encourage the student to see if that will help him or her figure out the problem until I can get there. Often the additional examples help the student understand the problem better.

3. Make math movies to assess understanding
Show Me

Explain Everything
I often ask students to show their solution to a problem on an app like Show Me or Explain Everything. There they can model their thinking using pictures or drawings, and they can record their voice as they explain their work. I learn so much about their understandings through their explanations, and it helps to assess the Standards for Mathematical Practice included in the Common Core.

4. Make a Vocabulary Notebook in Keynote


Keynote

I like to use Keynote for their math vocabulary because we can create slides that use the Frayer Model for vocabulary instruction. In addition to typing definitions, examples, and non-examples, they can draw their own pictures on a whiteboard app, take a screenshot, and add them to the slide. They can also search for real-world examples to photograph and add. Once they're finished, they can easily alphabetize their entries by rearranging the slides.

5. Use QR codes
Our math word wall has QR codes linking to the definitions of each term so students can quiz themselves about the meaning of a term or review terms they've forgotten. If you click on the image below, you can get a freebie example of this for the properties of multiplication.


My complete sets for grade 4, grade 5, and 4/5 combo are available at my TpT store.

We've also written riddles in Geometry where students could scan a QR code to find the answer. You can read my post about that here.


And we've used QR codes to help check homework assignments. I've written about that here.


I'm really just scratching the surface here -- there are so many other possibilities and several math specific apps to use, but I'll save those for future posts. I'm excited to read other examples of integrating technology into math, though, and if you haven't visited the linky yet, you definitely should. I got so many great ideas for reading and writing from it last week!

How do you use technology in Math?

Sunday, June 30, 2013

Tune Into Technology Linky: Integrating Technology into Reading

I'm excited to be linking up with iTeach 1:1 and Learning to the Core for their new series Tune into Technology. This week's topic is Integrating Technology into Reading, so I wanted to share 5 strategies I use to do this.

1. Let kids annotate their reading with GoodReader.


I've talked about this app before, but it's one of my favorites. GoodReader allows you to annotate pdf documents. I use it for almost all of my professional reading, and I've converted several documents into pdfs for my students as well. It's a fantastic tool because my students are able to leave "think marks" all over their reading, and I don't have to worry about them writing in a book or leaving sticky notes everywhere. We've even developed our own codes for how to use the annotation tools.


2. Share favorite books on KidBlog.


My students LOVE sharing the books they're reading on KidBlog, and they especially love reading and commenting on each other's blogs. I've talked more about how we do this in a previous post.

3. Create Book Trailers in iMovie.


Some of my students began doing this for fun at the end of the school year when we became a 1:1 iPad classroom, and I will definitely be doing this more next year. iMovie has some great templates built-in for this, and my students loved being able to share their favorite books through this medium.

4. Create book clubs and discussion groups on Edmodo.


We started using Edmodo at the end of the school year, and it was a great way to get conversations started or keep them going about the books we were reading in class. You can read more about getting started with Edmodo in my paperless series here.

5. Use Evernote and GoodReader to assess reading.


I use the running record templates from the Reading & Writing Project at Teacher's College. Because they're pdf files, I can annotate them in GoodReader, and I can record students while they're reading in Evernote. I've written a complete tutorial on how to do this here.

How do you integrate technology into reading instruction in your classroom? I'd love to hear your ideas. And be sure to link up with the Tune into Technology linky!

And don't forget to join us for the Southeastern Blogger Meet Up. Click the button below to get the details and RSVP!


Saturday, June 8, 2013

3 Favorite & Underappreciated Apps

I recently stumbled on an adorable blog called "Thirsty Firsties," and Kelly, the author, is hosting a linky party about iPad apps.


The rules are to share three apps - one free for classroom use, one paid for classroom use and one favorite app for personal use. She's also giving away an iTunes gift card as part of the linky, so be sure to check out her blog and join in the fun!

I've already shared many of the apps that I love and use in the classroom. See, for example, my list of favorite paid apps and my list of favorite free apps. So today, I'm branching out to share some of the apps that I've used and enjoyed this year that I haven't really talked about before.

Favorite Free App - Spelling City


Vocabulary Spelling City is a great app for teaching students vocabulary or spelling words. It has a variety of engaging games, and it can be used by students at all levels. The app itself is free and has a lot of functionality on its own. If you are a premium subscriber to Spelling City, however, it's a great complement to the activities you assign your students each week. I had my students doing activities on this app almost daily, and our differentiated weekly spelling tests were done entirely through this app (with the teacher premium subscription).

Favorite Paid App - Marble Math


Marble Math is a fun and challenging math game that addresses a broad range of math computation skills. I'll confess that I've even found myself playing it far longer than a typical "teacher test-drive" would require. The object is to navigate a marble through a maze by solving a variety of problems. It includes fractions, decimals, equations, and negative numbers, so this is probably best for grades 4 and higher. Of all of the apps on our iPads this year, this was the one that students seemed to gravitate toward most in their free time.

Favorite Personal App - Feedly


In the debate between Feedly and BlogLovin, I'm coming down on the side of Feedly for one major reason -- I LOVE the iPad app. It's really easy to flip through and navigate, it rotates, and it doesn't seem to crash as much as BlogLovin did. In fact, I've never had a single problem with it. I don't tend to comment on blogs as much from my iPad, so I can't speak to that aspect of comparing the two. Usually if I'm browsing blogs on my iPad, I'll mark the blogs that I want to comment on and comment through my computer later on. So for the sheer visual appeal of the app for reading blogs, I'm a big fan. This has become one of my favorite go-to apps on my iPad.

Now it's your turn. What are your three favorite apps? I'd love to hear about them, and be sure to link up with Kelly over at Thirsty Firsties if you get a chance. She's running the contest for the iTunes gift card through Monday.

And don't forget to link up with my Teacher Toolbox Trio celebration as well! I can't wait to discover more awesome classroom resources from TpT!


Monday, June 3, 2013

Paperless Mission #10: Distributing Student Assignments

This is the tenth installment in my Go Paperless! Challenge Series. You can check out the other entries in the series here. Also be sure to link up with my Paperless Challenge Linky!


Mission #10: Distribute Student Assignments through Shared Folders

Once my students had their iPads, I needed to figure out a way to get their work out to them. At first I tried using Edmodo, but that proved to be a bit glitchy for assignments where I wanted students to work with the materials in a different app like GoodReader. I needed to figure out an easy to manage workaround. Welcome back, Dropbox!
To do this, I created a new folder on Dropbox called "Student Assignments." I then right-clicked on the folder to pull up the option to "share link."

This pulls up a new window that shows the internal content of the folder in the background. Here, you could enter in a bunch of email addresses, but I prefer to click on "Get link." This copies a link to your clipboard for you to paste somewhere else.

Once I had the link to the folder, I put it in a highly visible spot on my class website. My students use my class website constantly, so getting to the link was easy for them once they knew where to find it. 

Once the folder was shared, I started to create the internal contents of the folder. I created 6 folders inside -- one for each day of the week and an archive folder. 

I numbered the days of the week to control the order of the files. Dropbox will alphabetize the folders otherwise.

As I gather resources or assignments that I want students to access, I save them as pdf files and I just put them in the folder to match the day that I expect them to do the assignment. At the end of the week, I move everything into the Archive folder, and I start over creating the assignments for next week. 

This system has worked incredibly well for me! Here's why:
  • Items in Dropbox sync immediately, so if we're in the middle of working on something and I realize that I've forgotten to give students something that would be helpful, I can just drag it into the folder. I don't have to sprint down to the copier. 
  • It's the ultimate organizer for absent students. If a kid misses class on Tuesday, they (and their parents) know to go to the Tuesday folder to see what assignments are there. There's no more worrying about lost papers or assignments.
  • The archive folder provides a great back-up for lost work. If a parent can't find a reading or a study guide to help before a test, there's an easy place to go to see all of the work.
  • It only requires a one-time set-up. Since I'm sharing the external folder and not the individual folders or assignments, I can change out what's inside the folder without having to get a new link to share. 
  • It doesn't require any log-ins or sign-ups from my students. They don't have email yet, and they don't have Dropbox accounts of their own, but that doesn't matter. Accessing shared files on Dropbox doesn't require a log-in of any sort. 
I've been incredibly happy with this system. Everything that I would have copied in the past has been easily distributed through my shared folder in Dropbox. 

What are some other ways you could use shared folders in Dropbox? I'd love to hear your ideas in the comments.

Monday, May 27, 2013

How I Decluttered my Inbox

I try out new apps constantly, but it is rare that I find one that I consider a game-changer -- one that revolutionizes how I do something and boosts my productivity.

Meet Mailbox.


Mailbox works with iOS mobile devices (iPhones, iPads) and GMail, and it can handle multiple GMail accounts. The idea is that your email box should always have ZERO messages in it, and it helps you achieve that goal by giving you four options for each message in your inbox.

Big-swipe to the left: Add to list


So many of the emails that I receive are ones that I don't need to respond to immediately, and Mailbox understands that by allowing you to file messages as low-priority action items. It has three main lists:
  • To Read -- great for newsletters and other items you're interested in reading at some point but not necessarily the second that it arrives in your inbox
  • To Watch -- my husband and some friends will sometimes send me YouTube videos that I can't watch at work -- not because they're NSFW, but because YouTube is categorically blocked at my school. These videos also tend to be low-priority items.
  • To Do -- emails of things to add to my "to do" list
It also gives you the option of creating additional lists. I made the "To Buy" list, for example, for items like subscription services that are going to expire sometime soon that I need to renew or for wishlist items that I'm thinking about buying someday. 

Short swipe to the left: Defer
Sometimes I receive messages that I want to deal with, but not at the time I've received it. When I'm using my iPhone, for example, I rarely respond to email because I prefer typing on my laptop. Some emails are ones that I'll look at more closely at night or over the weekend when I have more time. Other emails are ones that I want to deal with at a specific future time or date. Consider these examples:
  • a coupon for a clothing store that I might use but is only valid for a certain week in the future
  • a confirmation email for an upcoming trip or conference
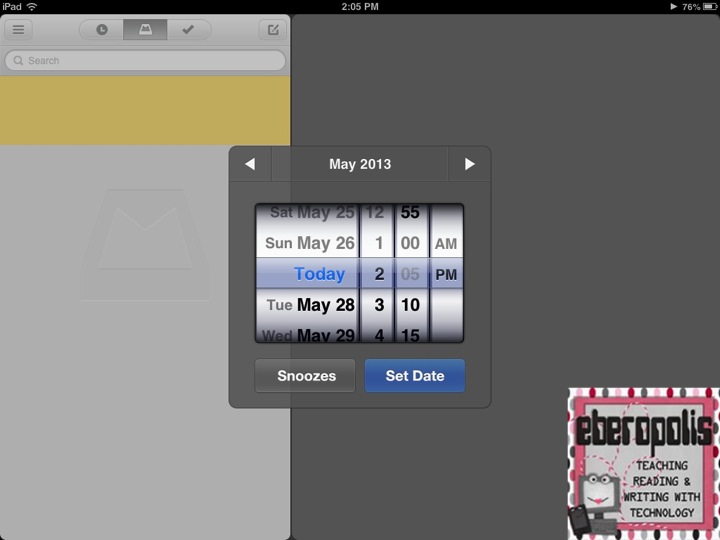
The beauty of the Mailbox app is that you can set the exact date and time when you want that message to reappear in your inbox by letting you "Pick Date."

The message will reappear in your inbox at the date/time you specify so it can get your attention rather than just getting pushed to the depths of your inbox to be forgotten.

Short swipe to the right: Archive the message
I might want to look for it someday, but it's not something I need to act on.

Long swipe to the right: Trash the message

Mailbox is a free app in the iTunes store, and in the three weeks that I've had it, it has replaced the default Mail app on my iPhone and completely changed the way that I manage email. I've gone from having literally 1,000s of emails in my inbox to having ZERO. It's the first time I've ever felt like I've been on top of my email situation.

The iPad version just came out this week, and I'm using that a lot, too. It has a larger interface, but all of the same features. Here's a screenshot of it on my iPad:
You can see that I have one message in my inbox -- a coupon that I have to use this weekend if I'm going to use it at all. I've deferred 14 messages -- some that I'll reply to on Tuesday, others that I want to deal with once I'm completely done with school on Thursday. I've got some lists, but I can also check the archive or the trash in case I accidentally swipe something into the wrong place and want to move it back out.

If you click on a message in your inbox, an image of it will appear on the right so you can decide what to do with it. It's a very easy-to-use and intuitive app, and now that I have it, I can't imagine giving it up. It's a huge asset to my productivity, and my only wish is that I could use this with other email platforms -- like my school/work emails -- that aren't GMail accounts.

Have you tried Mailbox yet? I'd love to hear about how you manage email productivity in the comments below.

Hope you're having a great Memorial Day weekend!

Related Posts Plugin for WordPress, Blogger...